1
Contents
Page No:
01
Why Hydroponics/Soil-less culture?
02
Hydroponics/Soil less culture - What is it?
02
History of hydroponics
03
Basic Requirements of Hydroponics
03
Classification of Hydroponics/Soil-less culture
04
Liquid or Solution Culture
04
Circulating Methods
04
Nutrient Film Technique (NFT)
05
Deep Flow Technique (DFT)-Pipe System
06
Non-Circulating Methods
07
Root Dipping Technique
10
Floating Technique
10
Capillary Action Technique
11
Solid Media Culture or Aggregate System
11
Hanging bag Technique (Open System)
12
Grow Bag Technique
13
Trench or Trough technique
15
Pot Technique
15
Aeroponic Technique
16
Nursery Techniques for hydroponics
17
Seed Germination
17
Planting material Production
17
Nutrient Supply
18
Nursery Period
18
Sponge Nursery Technique
2
...Contents
Page No:
19
Nutrient Solution for Soil-less culture
22
Electrical Conductivity (Ec)
22
Preparation of Nutrient Solution
23
Fertilizer Mixtures for Hydroponics
24
Fertigation
26
Training and Pruning
28
Management Requirements of Hydroponics/Soil-less culture
29
Soil-less culture and Controlled Environment agriculture
30
Some Problems and Solutions in Hydroponics
32
Insect Pest and Disease Damage in Hydroponics
32
Nutritional Disorders
36
Advantages of Hydroponics/Soil-less culture
36
Limitations of Hydroponics/soil less culture
37
Crops to grow with Hydroponics/Soil-less Culture
37
Harvesting, Grading, Storage and Marketing
38
Equipments for Hydroponics
42
Acknowledgements
3
HYDROPONICS/
SOIL-LESS CULTURE
Air
A
e
n
g
h
r
Water
Nutrients
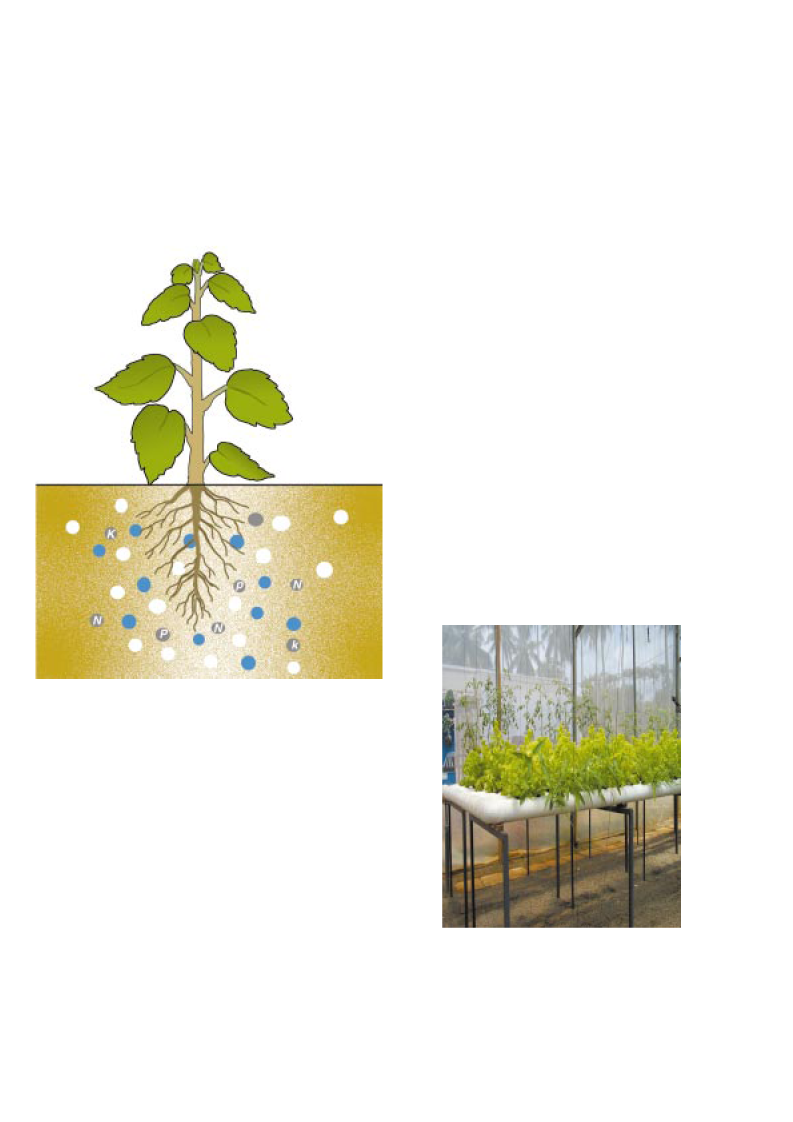
Figure 1: A plant grown in soil
Soil is usually the most available
growing medium and plants normally grow in
it. It provides anchorage, nutrients, air, water,
etc. for successful plant growth. Modification
of a soil an alternate growing medium tends
to be expensive. However, soils do pose
serious limitations for plant growth, at times.
Presence of disease causing organisms and
nematodes, unsuitable soil reaction,
unfavourable soil compaction, poor drainage,
degradation due to erosion, etc. are some of
them.
Further, continuous cultivation of crops
has resulted in poor soil fertility, which in turn
has reduced the opportunities for natural soil
fertility build up by microbes. This situation
has lead to poor yield and quality.
In addition, conventional crop growing
in soil (Open Field Agriculture) is difficult as it
involves large space, lot of labour and large
volume of water. And in some places like
metropolitan areas, soil is not available for crop
growing. Another serious problem experienced
since of late is the dif ficulty to hire labour for
conventional open field agriculture.
Why Hydroponics/
Soil-less Culture?
Hydroponics or soil-less culture is a
system of growing plants which helps reduce
some of the above mentioned problems
experienced in conventional crop cultivation.
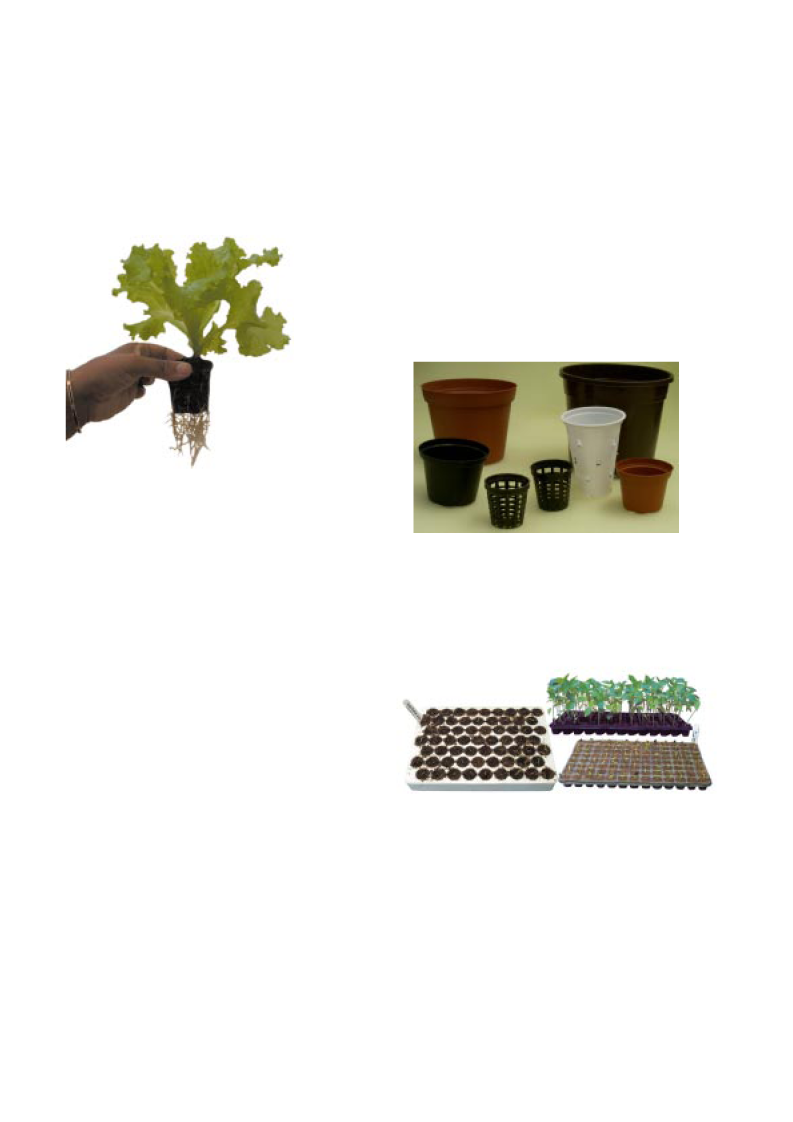
Figure 2: Hydroponics lettuce plant
4
c
a
o
Hydroponics offers opportunities to
provide optimal conditions for plant growth and
therefore, higher yields can be obtained
compared to open field agriculture.
Hydroponics or soil less culture offers
a means of control over soil-borne diseases
and pests, which is especially desirable in the
tropics where the life cycles of these organisms
continues uninterrupted and so does the threat
of infestation. Thus the costly and time-
consuming tasks of soil sterilization, soil
amelioration, etc. can be avoided with
hydroponics system of cultivation. It offers a
clean working environment and thus hiring
labour is easy.
Hydroponics/
Soil-less Culture�
What is it?
Hydroponics or soil-less culture is a
technology for growing plants in nutrient
solutions that supply all nutrient elements
needed for optimum plant growth with or
without the use of an inert medium such as
gravel, vermiculite, rockwool, peat moss, saw
dust, coir dust, coconut fibre, etc. to provide
mechanical support.
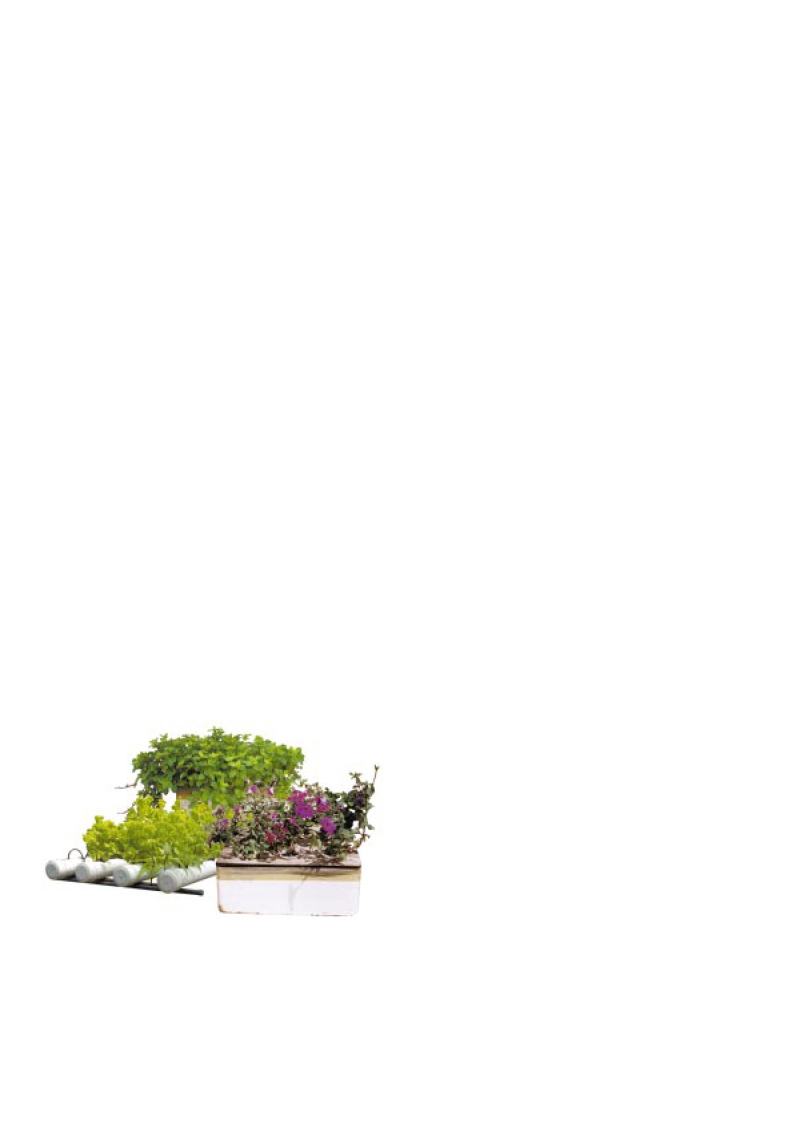
Figure 3: Examples for hydroponics/ soil-less culture
History of Hydroponics
Hydroponics was practiced many
centuries ago in Amazon, Babylon, Egypt, china
and India where ancient men used dissolved
manure to grow cucumber, watermelons and
other vegetables in sandy riverbeds. The
�hanging harden of Babylon� and the Aztec�s
floating farms were actually prototypes of
hydroponic systems. Later, when plant
physiologists started to grow plants with specific
nutrients for experimental purposes, they gave
the name �nutriculture.�
Interest in practical application of
�nutriculture� developed in 1925 when the
green house industry expressed interest in its
use. Green house soils had to be replaced
frequently to overcome problems of soil
structure, fertility and pests. As a result,
researchers became interested in the potential
use of nutriculture to replace conventional soil
culture.
In 1929, Dr. William F. Gericke of the
University of California succeeded in growing
tomato vines of 7.5 m height in nutrient
solutions. He named this new production
system �hydroponics� a word derived from
Greek to reflect the importance of �Hydros�
(water) and �Ponos� (working).
Thus,
hydroponics broke the laboratory bounds and
entered the world of practical horticulture. The
term hydroponics originally meant nutrient
solution culture. However, crop growing in inert
solid media using nutrient solution is also
included in hydroponics in broad sense.
During 1960s and 70s, commercial
hydroponics farms were developed in Abu
Dhabi, Arizona, Belgium, California, Denmark,
German, Holland, Iran, Italy, Japan, Russian
Federation and other countries. During 1980s,
many
automated
and
computerized
hydroponics farms were established around the
world. Home hydroponics kits became popular
during 1990s.
5
This requirement must be artificially maintained
in hydroponics. In any hydroponics system
the following basic requirements must be
maintained at optimum levels.
Buffer action of water or the inert
medium used.
The nutrient solution or the fertilizer
mixture used must contain all micro and
macro elements necessary for plant
growth and development.
Buffer action of the nutrient solution
must
be in the suitable range so that
plant root system or the inert medium is
not affected.
The temperature and aeration of the
inert medium or the nutrient solution is
suitable for plant root system.
Classification of
Hydroponics/
Soil-less Culture
The term hydroponics originally meant
nutrient solution culture with no supporting
medium. However, plant growing in solid media
for anchorage using nutrient solution is also
included in hydroponics. This technique is
called aggregate system. Hydroponics
systems are further categorized as open (i.e.,
once the nutrient solution is delivered to the
plant roots, it is not reused) or closed (i.e.,
surplus solution is recovered, replenished and
recycled). Current hydroponics systems of
cultivation can be classified according to the
techniques employed. A hydroponic technique
refers to the method of applying nutrient
solution to the plant roots.
Large numbers of hydroponic
techniques are available. However, consider
following factors in selecting a technique.
6
In Sri Lanka, the hydroponics system
of cultivation is in its infancy. Many use inert
solid medium such as coconut fibre or coir-dust
with fertigation and some use balanced nutrient
solution alone employing both circulating and
non-circulating methods in small and medium
scales.
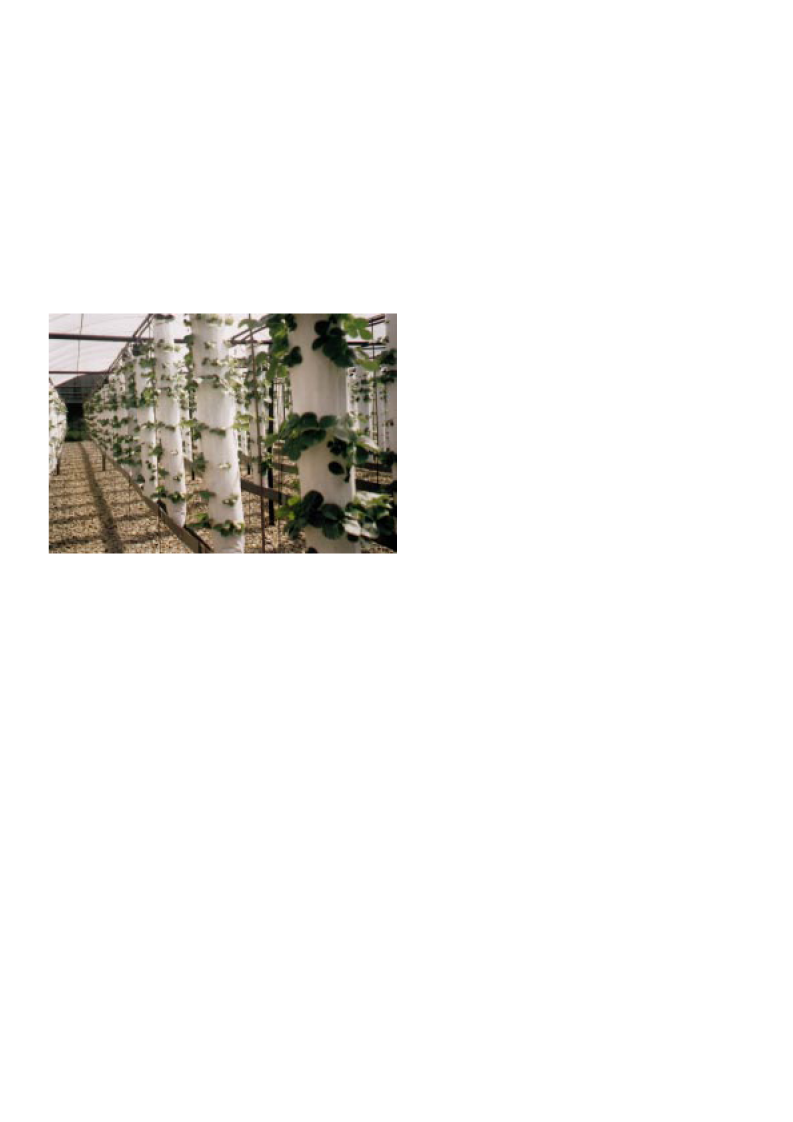
Figure 4: Hydroponics strawbery plants in a net house
Basic Requirements of
Hydroponics
Soils naturally maintain the temperature
and aeration needed for root growth. When the
soil is poor, plant growth and yield decline also
due to unsuitable aeration and temperature.
Plant cultivation is impossible under ill drained
condition due to these conditions. Soil adjusts
itself to provide suitable conditions for plant
growth. It is called the buffer action of the soils.
Plants also absorb nutrients released through
natural mineralization.
In a solution or inert medium,
maintenance of acidity or alkalinity (pH) and
electrical conductivity (Ec) in suitable ranges
for plant root system is called buffer action.
Space and other resources available
Expected productivity
Availability of suitable growing medium
Expected quality of the produce � colour,
appearance, free from pesticides, etc.
1. Solution culture or Liquid hydroponics
-Circulating methods (closed system)
Nutrient film technique (NFT)
Deep flow technique (DFT)
-Non-circulating method (open systems)
Root dipping technique
Floating technique
Capillary action technique
2. Solid media culture (Aggregate systems) �
These can be open systems or closed
systems.
-Hanging bag technique
-Grow bag technique
-Trench or trough technique
-Pot technique
3. Aeroponics
-Root mist technique
-Fog feed technique
Channel made of
flexible sheet
Tap valve
Wooden plank
Timer
Liquid or Solution
Culture
CIRCULATING METHODS
The nutrient solution is pumped
through the plant root system and excess
solution is collected, replenished and reused
in these methods.
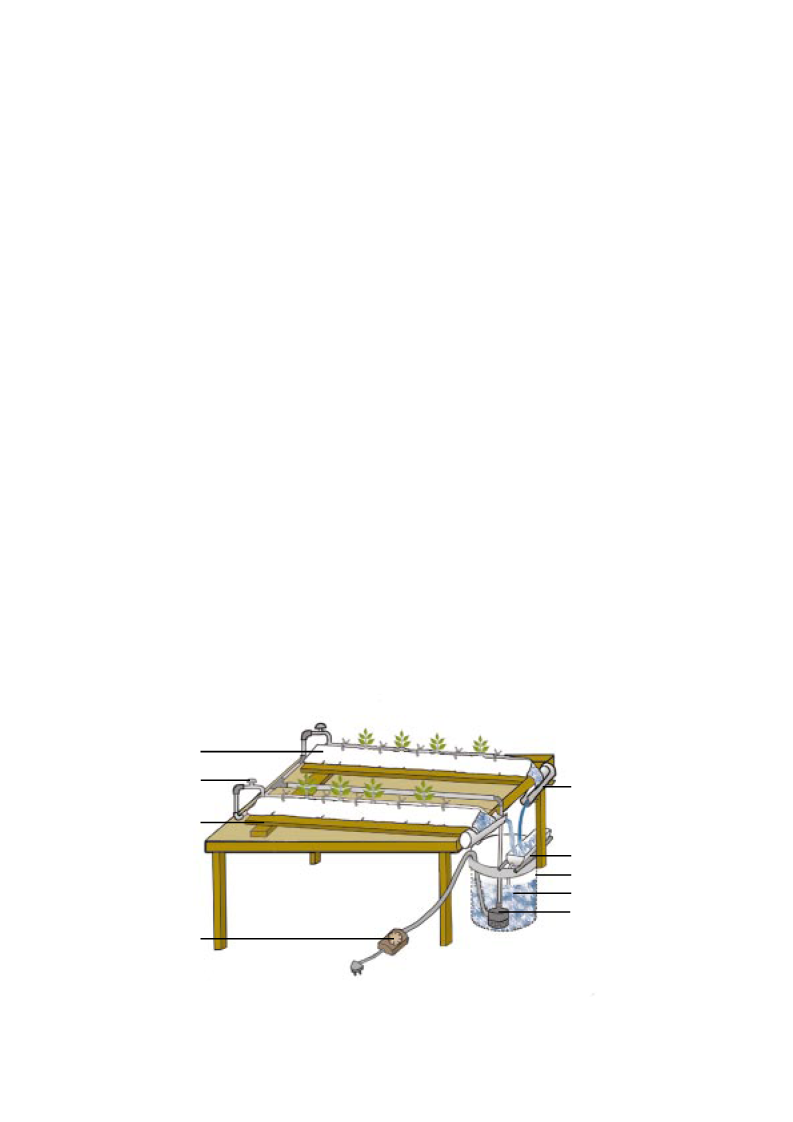
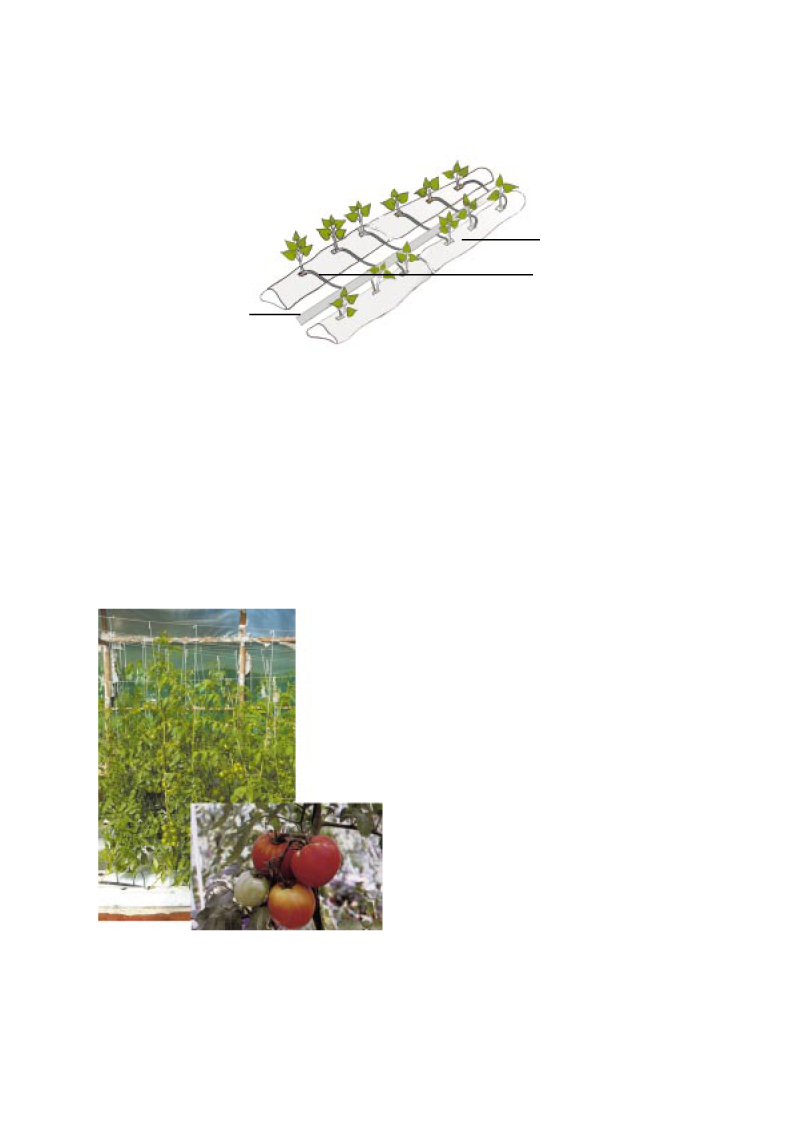
Nutrient Film Technique
(NFT)
NFT is a true hydroponics system
where the plant roots are directly exposed to
nutrient solution. A thin film (0.5 mm) of nutrient
solution flows through channels. The main
features of a NFT system are shown in figure
5.
The channel is made of flexible sheet.
The seedlings with little growing medium are
placed at the centre of the sheet and both
edges are drawn to the base of the seedlings
and clipped together (Figure 6) to prevent
evaporation and to exclude light. The cross
section of the channel is shown in figure 7.
The growing medium absorbs nutrient solution
for young plants and when the plants grow the
roots form a mat in the channels.
PVC pipe
Sieve
Solution container
Nutrient solution
Submersible pump
Figure 5: Main features of a NFT system
7
Clip
Figure 7: Cross Section of a NFT channel
In practice, it is very difficult to maintain
a very thin film of nutrient solution and therefore,
this technique has undergone several
modifications.
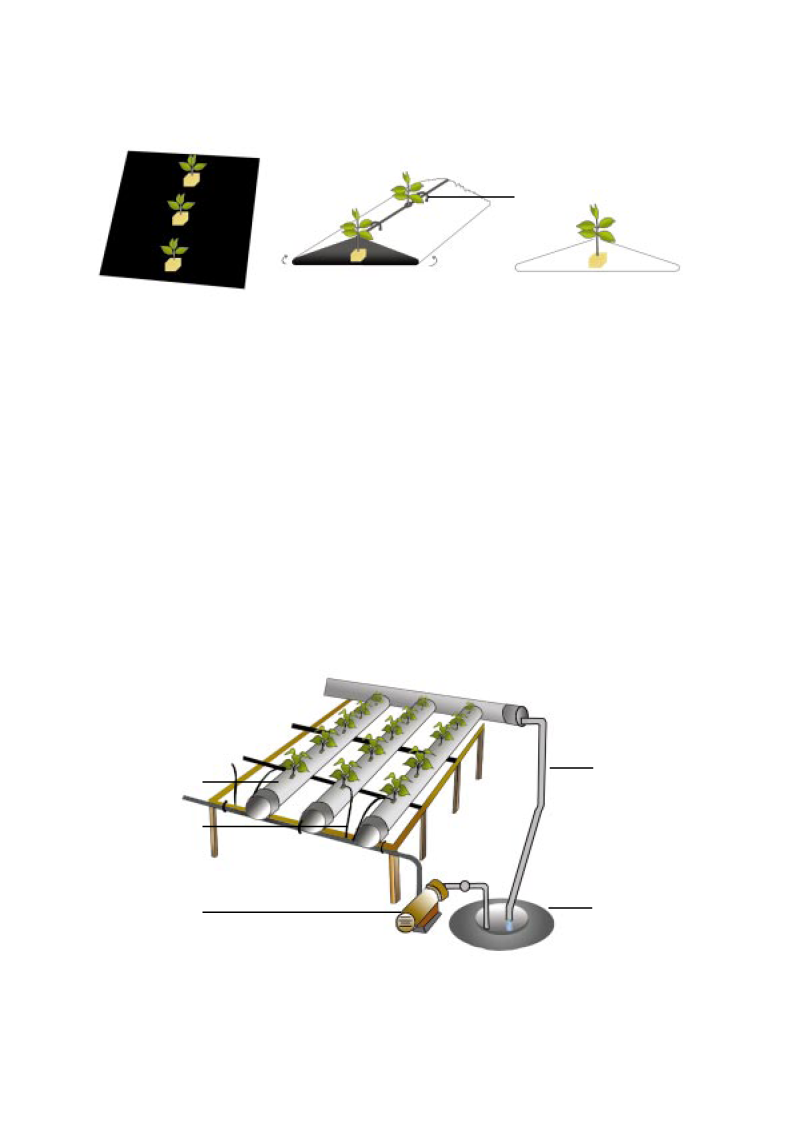
Deep Flow Technique (DFT)
� Pipe System
As the name implies, 2-3 cm deep
nutrient solution flows through 10 cm diameter
PVC pipes to which plastic net pots with plants
are fitted. The plastic pots contain planting
materials and their bottoms touch the nutrient
solution that flows in the pipes. The PVC pipes
may be arranged in one plane or in zig zag
shape depending on the types of crops grown.
The figure 8 and 10 below shows the main
features of a DFT � pipe system.
Drainage pipe to
send recycled
solution to the tank
Underground nutrient
solution stock tank
→
Figure 6: Basic structures of a NFT channel
The maximum length of the channel is
5-10 m and is placed at a slope drop of 1 in 50
to 1 in 75. The nutrient solution is pumped to
the higher end of each channel and flows by
gravity to the lower end wetting the root mat.
At lower end of the channels nutrient
solution gets collected and flows to the nutrient
solution tank. The solution is monitored for
salt concentration before recycling. Some
growers replace the nutrient solution every
week with fresh solution.
Adjust the flow rate of the nutrient
solution to 2-3 litres per minute depending on
the length of the channel. Provide enough
support for tall growing plants in this technique.
100mm PVC pipe
painted white
Delivery tube
Pump
Figure 8: An illustration of a single plane pipe system DFT
8
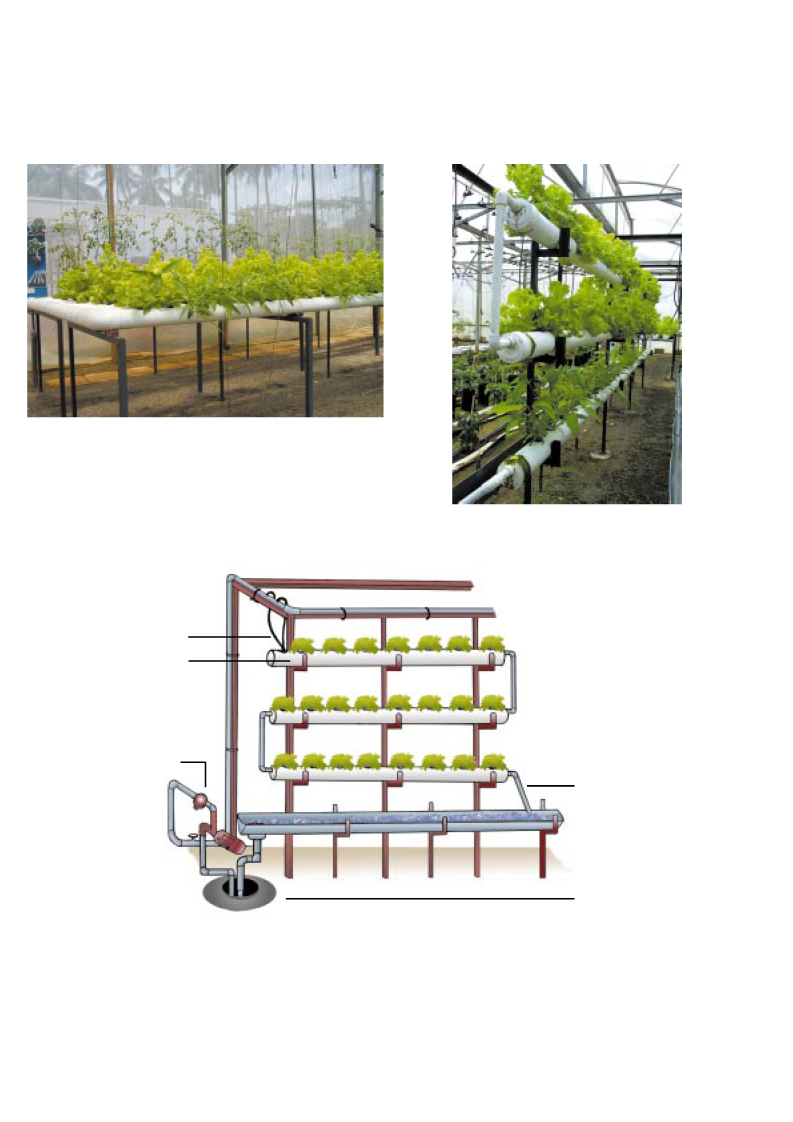
Figure 11: A zig zag pipe system DFT
Dranage pipe to
send recycled
solution to the tank
Underground
nutrient solution
stock tank
Figure 9: A Single plane pipe system DFT
The zig zag system utilizes the space
efficiently but suitable for low growing crops.
The single plane system is suitable for both tall
and short crops.
Delivery tube
PVC pipe
painted
white
Pump
Figure 10: An illustration of a zig zag pipe system DFT
9
Net pot
plastic pot
Plastic pot with
established plant
Net pot with established
plant
Figure12
lining in the net pots to prevent the planting
material falling into the nutrient solution. Small
plastic cups with holes on the sides and bottom
may be used instead of net pots.
When the recycled solution falls into the
solution in the stock tank, the nutrient solution
gets aerated. The PVC pipes must have a
slope of drop of 1 in 30-40 to facilitate the flow
of nutrient solution. Painting the PVC pipes
white will help reduce the heating up of nutrient
solution. This system can be established in
the open space or in protected structures as
part of CEA.
NON-CIRCULATING
METHODS
The nutrient solution is not circulated
but used only once. When its nutrient
concentration decreases or pH or Ec changes,
it is replaced.
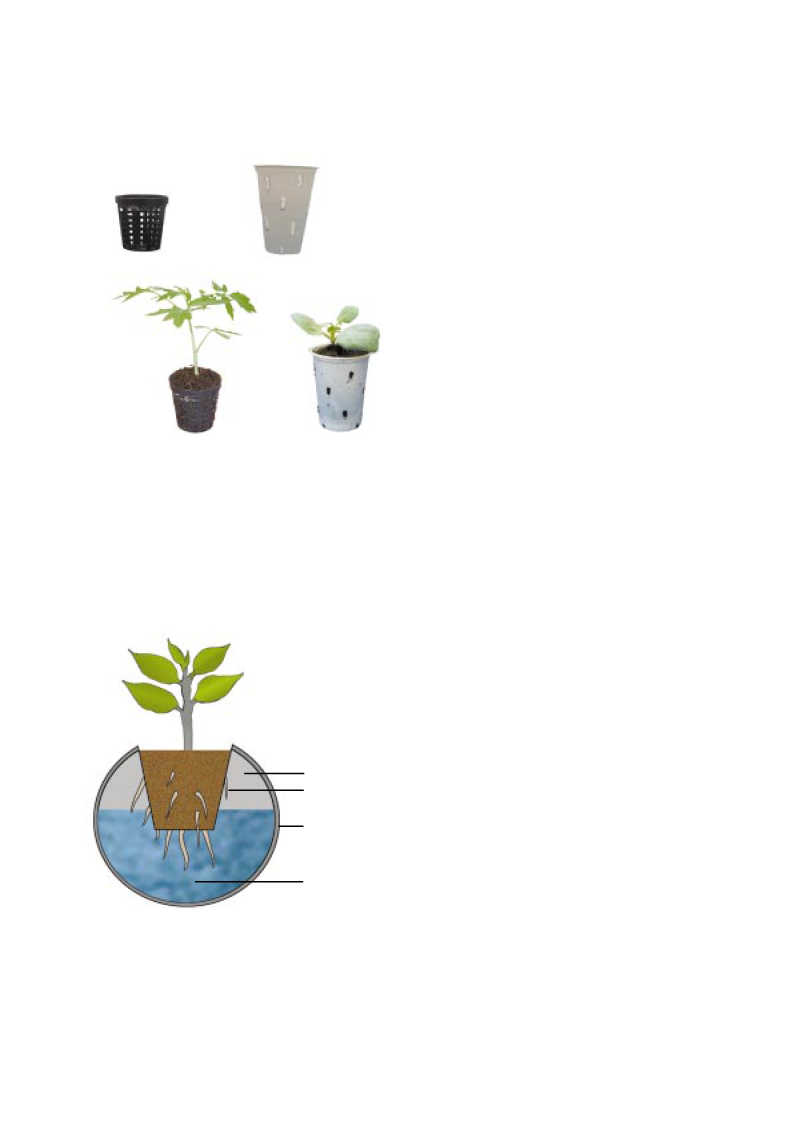
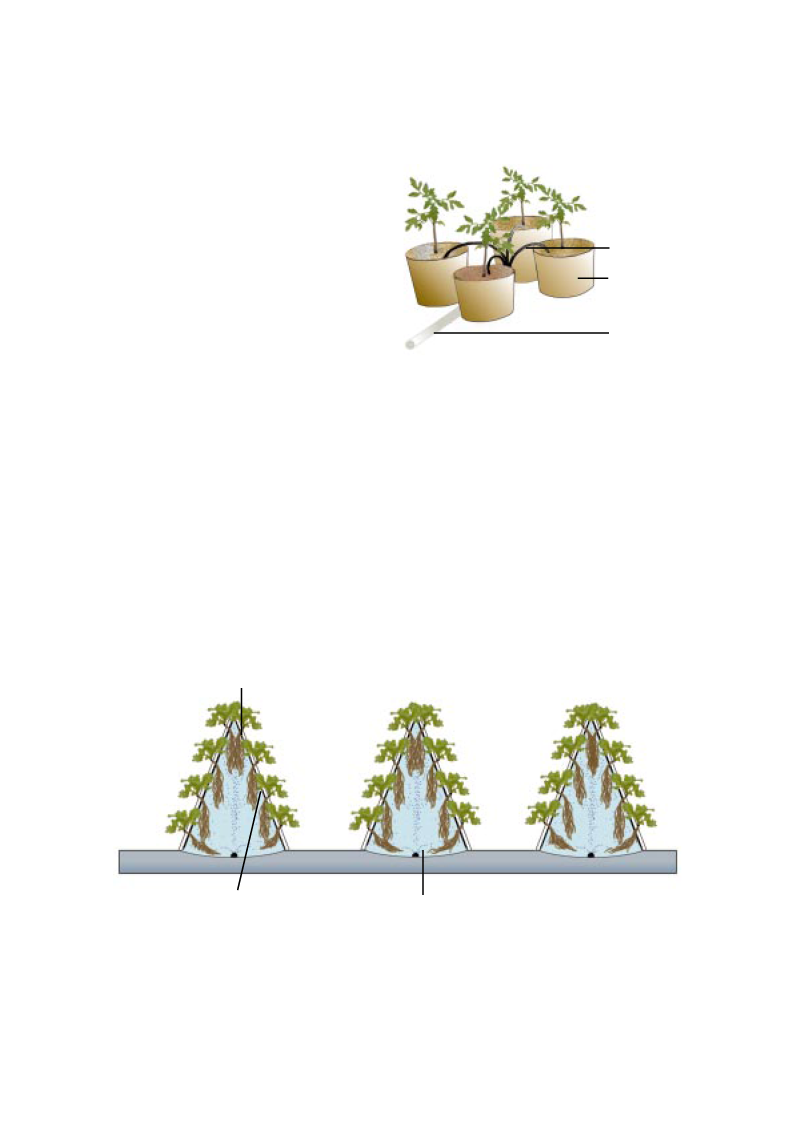
Root Dipping Technique
In this technique, plants are grown in
small pots filled with little growing medium. The
pots are placed in such a way that lower 2 - 3
cm of the pots is submerged in the nutrient
solution (figure 14). Some roots are dipped in
the solution while others hang in the air above
the solution for nutrient and air absorption,
respectively.
This technique is easy and can be
developed using easily available materials.
This �low tech� growing method is inexpensive
to construct and needs little maintenance.
Importantly, this technique does not require
expensive items such as electricity, water
pump, channels, etc. For root crops (beet,
raddish, etc.) however, an inert medium has to
be used.
10
Plants are established in plastic net pots
and fixed to the holes made in the PVC pipes.
Old coir dust or carbonised rice husk or mixture
of both may be used as planting material to fill
the net pots. Place a small piece of net as a
Air space
Air absorbing
roots
PVC pipe
Nutrient
solution
Figure 13: Cross section of a PVC pipe system DFT
Planting pot
Planting medium
Air absorbing roots
Nutrient absorbing roots
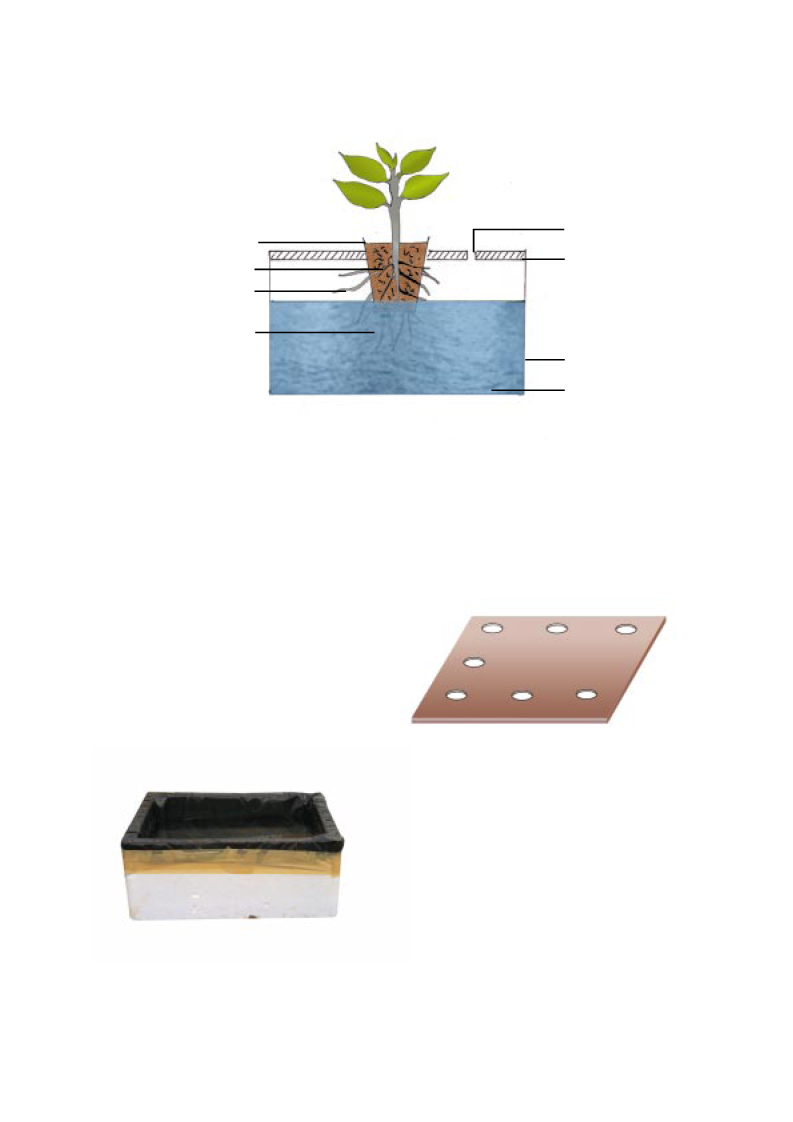
Figure 14: Diagrammatic view of a non-circulating hydroponics non-root tuber plant
Hole for air passage
and refilling
A board to cover
container and to fix
planting pots
Container
Nutrient solution
A board is required to place on the
container to prevent light penetration. The
planting pots are also fixed to this board (figure
16). The number of holes in the board to fix
the pots depends on the crops to be grown.
An additional hole is necessary for air
circulation and refilling.
Figure 16: Boards with holes to cover the box and
to which pots are fixed
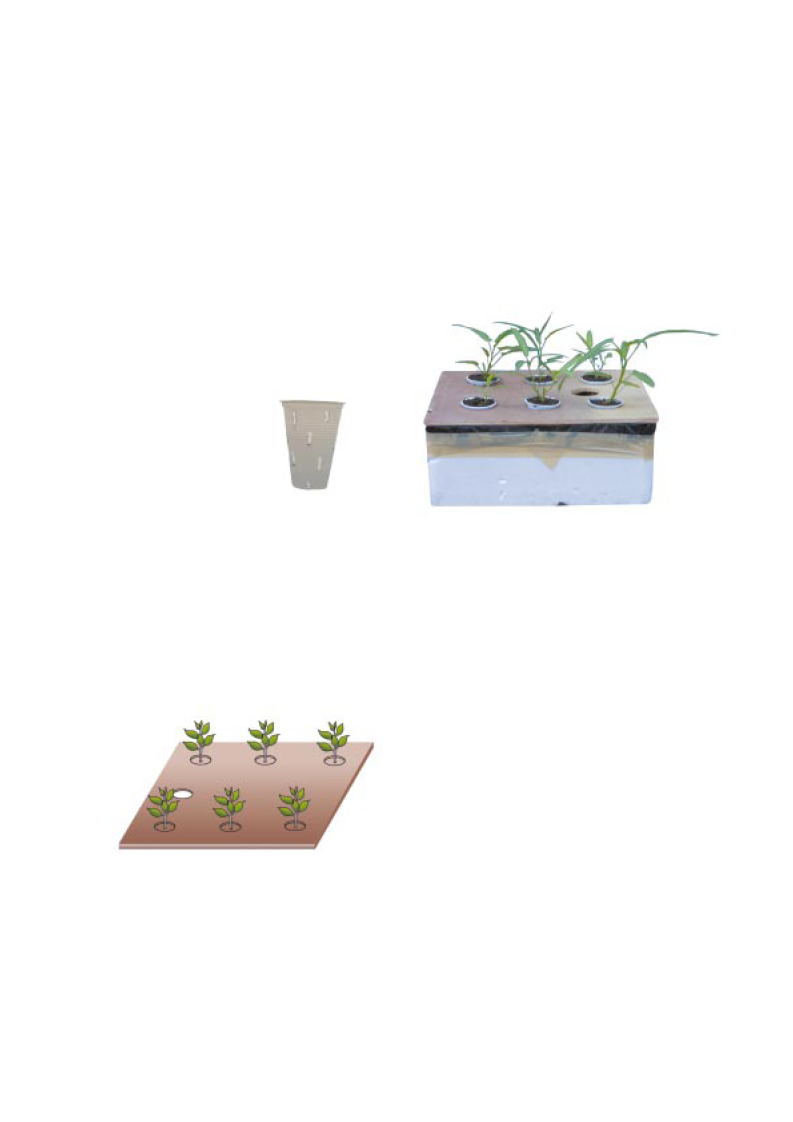
Seedlings are transplanted in plastic
pots filled with sterilized old coir-dust or
carbonised rice husk or the mixture of the two.
Plastic net pots or plastic cups can be used.
Make some holes at the bottom and on
sides of the plastic cups for roots to emerge
and for the nutrient solution to seep into the
11
1.
Root dipping technique for
non-root tuber crops
First, select a container for nutrient
solution. The container can be almost any
kind and shape except metal containers.
Styrofoam or wooden boxes, plastic buckets
or even cement troughs can be used.
Styrofoam boxes are good as they can maintain
the temperature of the nutrient solution. Place
a black plastic sheet of at least 0.15 mm
thickness as lining inside the boxes to avoid
leakage and to reduce the light (figure 15).
The depth of the box must be about 25 � 30
cm to provide enough solution as well as
enough space above the solution for oxygen
absorbing roots.
Figure 15: Container with black polythene lining
Maintain adequate air space above the
nutrient solution in the container. Success of
the non-circulating hydroponics system
depends on the rapid growth and quantity of
roots that are exposed to the air. These roots
absorb oxygen for the plants. Ideally, top two
Figure 19: Non-circulating hydroponic plants
growing in a Styrofoam box
thirds of the young root system must be in the
air and the rest must be floating/dipping in the
nutrient solution.
During crop growth, when the solution
level in the container goes down, the ion
concentration may increase. Such increase is
detrimental to plant growth. If this condition is
observed, siphon out the remaining solution
and refill with fresh solution.
2.
Root dipping technique for
root tuber crops
A 20 � 30 cm deep container can be
used. It is lined with black polythene sheet
and filled 1/3rd with nutrient solution. Leaving
a space of about 7.5 cm above the solution
level, fix a wire mesh in the box and fill with an
inert medium (Figure 20). The seedlings/seeds
are planted in the medium.
12
potting material (figure 17). Place a small
piece of net inside the pots or cups to prevent
potting materials falling into the solution. Seeds
could also be planted directly in the pots to
raise the crop.
Fill 2/3rd of the container with nutrient
solution. The pots with the plants are fitted on
to the board as shown in figure 18 and will be
placed on top of the box. Only the bottom 2
cm of the pots will be submerged in nutrient
solution.
Figure 17: planting pots
The above steps complete the formation
of non-circulating hydroponics system. These
boxes can be placed in net houses or in open
space or under rain shelters or in-door. Tall
growing plants will require some support to
prevent from falling.
Figure 18: Potted plants fixed to the board to
cover the container
Wire mesh
Perforated tube fill
with gowing medium
which will be removed
letter
Figure 20: Diagrammatic view of the root dipping technique for root tuber crops
At the early stage, nutrient solution will
reach the planting medium through the
perforated PVC pipe filled with the growing
medium by capillary action. Later, plant roots
will grow into the nutrient solution through wire
mesh. At this stage, the perforated tube will
be removed. The resulting hole will facilitate
aeration and refilling.
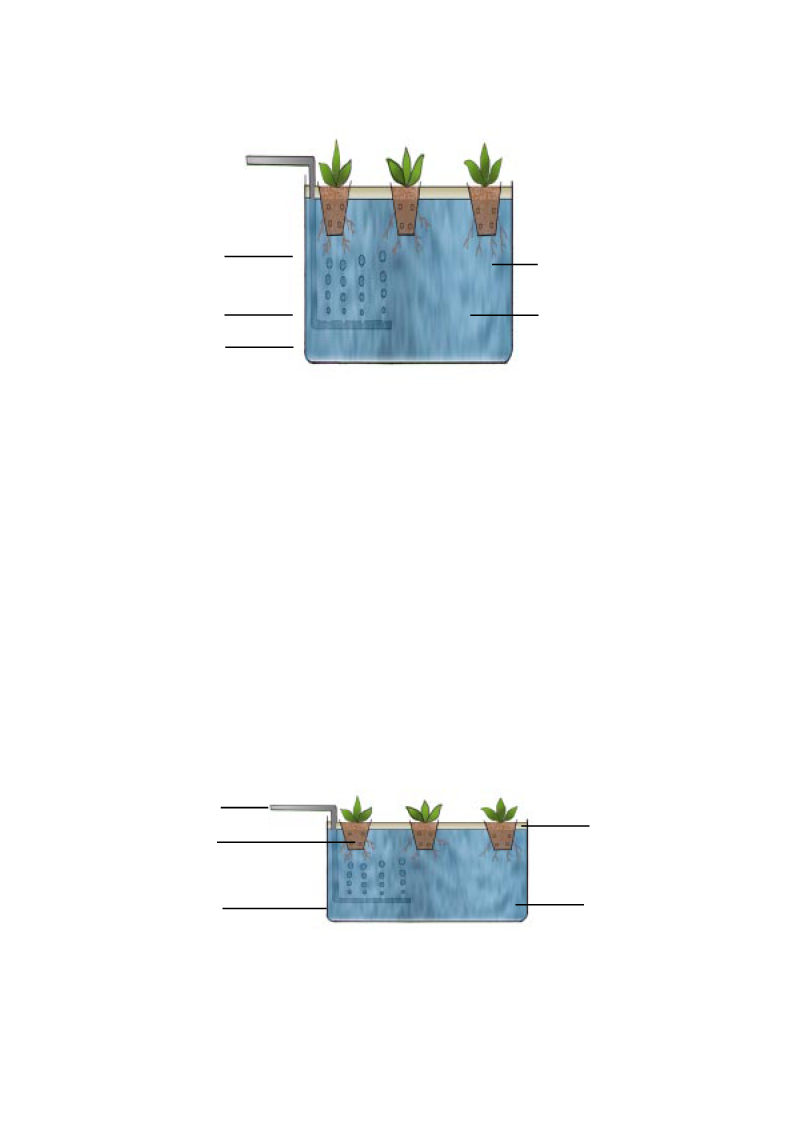
Floating Technique
This is similar to box method but
shallow containers (10 cm deep) can be used.
Plants established in small pots are fixed to a
Artificial
aeratiobn
Planting pots fixed
to styrofoam board
Container
Styrofoam sheet or any other light plate and
allowed to float on the nutrient solution filled in
the container (Figure 21) and solution is
artificially aerated.
Capillary Action Technique
Planting pots of different sizes and
shapes with holes at the bottom are used. Fill
these pots with an inert medium and plant
seedlings/seeds in that inert medium. These
pots are placed in shallow containers filled with
the nutrient solution. Nutrient solution reaches
inert medium by capillary action (Figure 22).
Aeration is very important in this
technique. Therefore, old coir dust mixed with
sand or gravel can be used. This technique is
suitable for ornamental, flower and indoor
Styrofoam board
floating innutrient
solution
Nutrient
solution
Inert growing
medium
Air space
Nutrian Solution
Figure 21: Diagrammatic view of floating technique
13
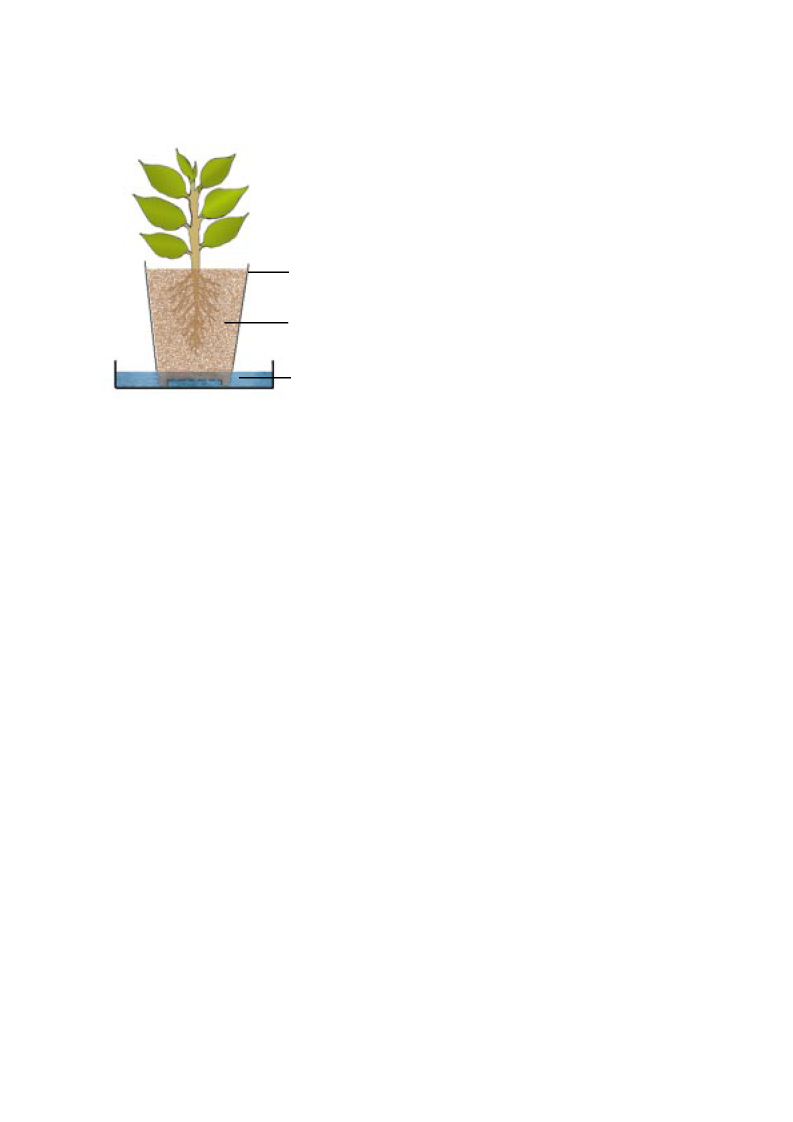
Container with
holes at bottom
Highly porous
growing medium
Nutrient solution
Figure 22: Capillary action technique
plants.
Solid Media Culture or
Aggregate System
The following techniques involving
inert solid media can be practiced using locally
available materials. The media material
selected must be flexible, friable, with water
and air holding capacity and can be drained
easily. In addition, it must be free of toxic
substances, pests, disease causing
microorganisms, nematodes, etc. The medium
used must be thoroughly sterilized before use.
�
Inorganic natural media (gravel
culture)
�
Organic natural media (smoked rice
husk, saw dust, coconut fibre, coir dust
peat moss)
�
Inorganic artificial media (rockwool,
perlite, vermiculite)
�
Organic artificial media (polyurethane,
polyphenol, polyether, polyvinyl)
Tanins and acids present in the newly
extracted coir-dust affect plants. Therefore,
use at least 06 months old coir-dust. Dry, clean
compressed coir-dust blocks are available for
sale in the market.
Different techniques described below,
according to the method of holding the planting
medium, can be practiced.
Hanging Bag Technique
(Open system)
About 1 m long cylinder shaped, white
(interior black) UV treated, thick polythene
bags, filled with sterilized coconut fibre are
used. These bags are sealed at the bottom
end and tied to small PVC pipe at the top.
These bags are suspended vertically
from an overhead support above a nutrient
solution-collecting channel. Therefore, this
technique is also knows as �verti-grow�
technique. Seedlings or other planting materials
established in net pots are squeezed into holes
on the sides of the hanging bags. The nutrient
solution is pumped to top of each hanging bag
through a micro sprinkler attached inside the
hanging bags at the top. This micro sprinkler
evenly distributes the nutrient solution inside
the hanging bag. Nutrient solution drips down
wetting the coconut fibre and plant roots.
Excess solution gets collected in the channel
below through holes made at the bottom of the
hanging bags and flows back to the nutrient
solution stock tank (Figure 23).
This system can be established in the
open space or in protected structures. In
protected structures, the hanging bags in the
rows and amongst the rows must be spaced
in such a way that adequate sunlight falls on
the bags in the inner rows.
14
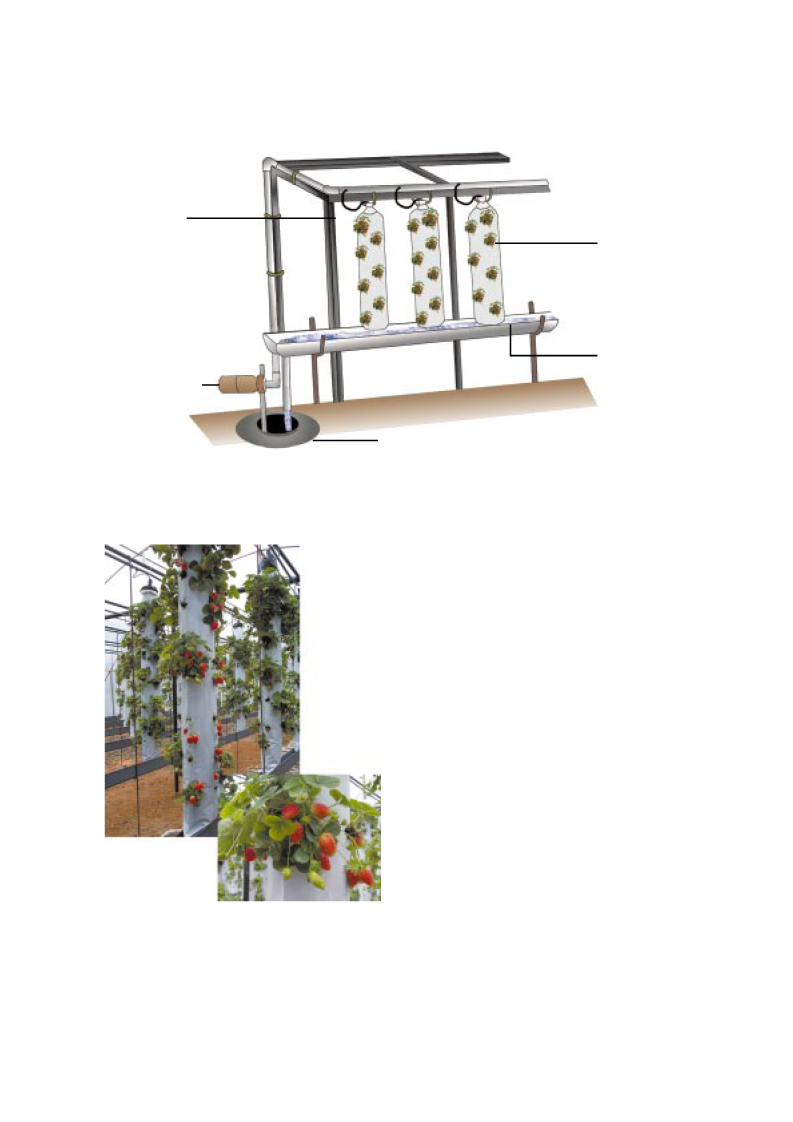
Hanging bags
filled with coir
fiber
Recycled
nutrient solution
Underground nutrient solution stock tank
Figure 23: Diagrammatic view of hanging bag technique
Nutrient
solution
delivery pipe
Pump
Figure 24: Strawbery plants growing in
hanging bags
The bags are not heavy as they are filled
with coconut fibre and can be used for about
02 years. The number of plants per bag varies
depending on the plants. About 20 lettuce
plants can be established per bag. This system
is suitable for leafy vegetables, strawberry, and
small flower plants. Black colour tubes will have
to be used for nutrient solution delivery to
prevent mould growth inside.
Grow Bag Technique
In this technique 1 � 1.5 m long white
(inside black), UV resistant, polythene bags
filled with old, sterilized coir-dust are used.
These bags are about 6 cm in height and 18
cm wide. These bags are placed end to end
horizontally in rows on the floor with walking
space in between (Figure 25). The bags may
be placed in paired rows depending on the
crop to grow.
Make small holes on the upper surface
of the bags and squeeze seedlings or other
planting materials established in net pots into
15
the coir-dust. 2-3 plants can be established
per bag. Make 02 small slits low on each
side of the bags for drainage or leaching.
Fertigation with black capillary tube
leading from main supply line to each plant is
practiced. The nutrient solution and water may
also be added manually to these bags.
Depending on the stage of crop growth and
the prevailing weather conditions, vary the
Figure 26: Tomato plants growing in grow bags
amount of water applied. Make sure that the
growing media is not completely saturated with
water or nutrient solution, as it prevents the
oxygen supply to plant roots.
Cover the entire floor with white UV
resistant polythene before placing the bags.
This white polythene reflects the sunlight to
the plants. It also reduces the relative humidity
in between plants and incidence of fungal
diseases. When tall growing plants are
established supporting structures will be
necessary.
Trench or Trough Technique
In this open system, plants are grown
in narrow trenches in the ground (Figure 27) or
above ground troughs (figure 28) constructed
with bricks or concrete blocks.
Both trenches and troughs are lined
with waterproof material (thick UV resistant
polythene sheets in two layers) to separate
the growing media from rest of the ground.
The width of the trench or trough can be
decided depending on the ease of operation.
Wider trenches or troughs will permit two rows
of plants. The depth varies depending on the
plants to grow and a minimum of 30 cm may
be necessary.
16
Grow bags filed
with coir-dust
Nutrient solution
delivery tube
Nutrien solution
supply line
Figure 25: Diagrammatic view of plants in grow bags
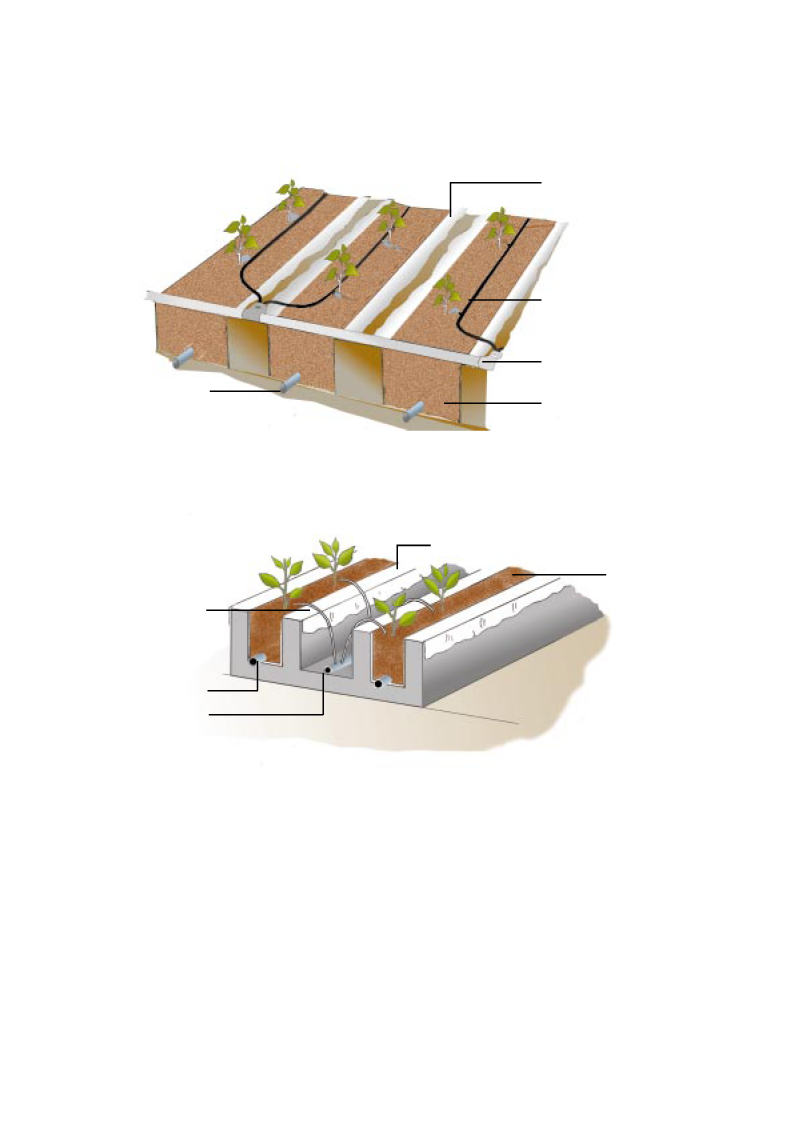
Polythene film
Nutrient solution delivery
pipe
Nutrient solution supply
line
Drainage pipe
Trench filed with growing
medium
Figure 27: Cross section of hydroponic trenches
Polythene film
Trough filed with
growing medium
Nutrient solution
delivery pipe
Drainage pipe
Nutrient solution
supply line
Figure 28: Cross section of above ground troughs
2.5 cm diameter may be placed at the bottom
of the trough or trench to drain out excess
nutrient solution.
Tall growing vine plants (cucumber,
tomato, etc.) need additional support to
withstand the weight of the fruits.
17
Old coir dust, sand or gravel, peat,
vermiculite, perlite, old sawdust or mixture of
these materials can be used as the media for
this culture. The nutrient solution and water
are supplied through a drip irrigation system
or manual application is also possible subject
to labour availability. A well-perforated pipe of
Nutrient solution
delivery pipe
Pot filed with
growing medium
Nutrient solution
supply line
Figure 29: Hydroponics plants in pot technique
The aeroponic culture is usually
practiced in protected structures and is suitable
for low leafy vegetables like lettuce, spinach,
etc.
The principal advantage of this
technique is the maximum utilization of space.
In this technique twice as many plants may be
accommodated per unit floor area as in other
systems. Another potential application of this
technique is in the production of plants free of
soil particles from cuttings for exports.
Nutrient solution mist
Pot Technique
Pot technique is similar to trench or
trough culture but growing media is filled in
clay or plastic pots (Figure 29). Volume of the
container and growing media depend on the
crop growth requirements. The volume ranges
generally from 01 to 10 litres.
Growing media, nutrient solution
supply, providing support to plants, etc. is
similar to that of trough or trench culture.
Aeroponic Technique
Aeroponic is a method of growing
plants where they are anchored in holes in
Styrofoam panels and their roots are
suspended in air beneath the panel. The
panels compose a sealed box to prevent light
penetration to encourage root growth and
prevent algae growth. The nutrient solution is
sprayed in fine mist form to the roots. Misting
is done for a few seconds every 2 � 3 minutes.
This is sufficient to keep roots moist and nutrient
solution aerated. The plants obtain nutrients
and water from the solution film that adheres
to the roots.
Styrofoam pannel
Plastic lining
Figure 30: Aeroponic A-frame unit, developed by Jensen and Collins in 1985 at the University of Arizona
18
Nursery Containers/ Trays
Use a container that provides the
suitable condition for seed germination and also
according to crop and cultivation method.
Individual containers / Growing blocks:
paper pots, plastic pots, clay pots,
Styrofoam pots, coconut fibre pots, rockwool
blocks, sponge blocks
Figure 31: Some individual containers
Trays:
Styrofoam trays, speedling/cell plug trays
Figure 32: Trays
Trays made up of different materials
are available for sale in market. Depending on
the requirements, trays may be selected.
19
Nursery Techniques for
Hydroponics
As in open field
agr i cul t ur e,
production of
v i g o r o u s
seedlings or
p l a n t i n g
material of
high yielding
varieties is an essential
step of hydroponics/soil-
less culture, to obtain
economic yields.
Nursery Medium
The growing medium must provide
satisfactory conditions for seed germination
and to raise pest and disease free seedlings.
A material that is friable, moderately fertile, well
drained yet have sufficient water holding
capacity and good aeration and free of pests
and disease causing organisms must be
selected as medium for seed germination or
rooting the planting materials.
The following materials can be used
as medium to raise seedlings or to root planting
materials.
- Old coir-dust
- Carbonised rice husk
- Fine sand or fine sand and old coir
dust mixture
- Rockwool, Peat, perlite or vermiculite,
etc.
Sterilize the medium before use. For
coir-dust, add hydrated lime to bring its pH to
neutral. For a 05 kg coir-dust block, about 100
� 250 g hydrated lime is needed.
Gotukola-
Plantlets or runners separated
from mother plants.
Strawberry- Plantlets or runners separated
from mother plants
Gerbera-
Plantlets separated from
mother plants
Mukunuwenna-
10 � 12 cm long semi-
hardwood or hardwood
stem cuttings.
Kang Kong- 20 cm long semi-hardwood
cuttings with 3-4 nodes.
Mint-
10 � 12 cm long semi-
hardwood stem cuttings
Sarana-
Semi-hardwood stem cuttings.
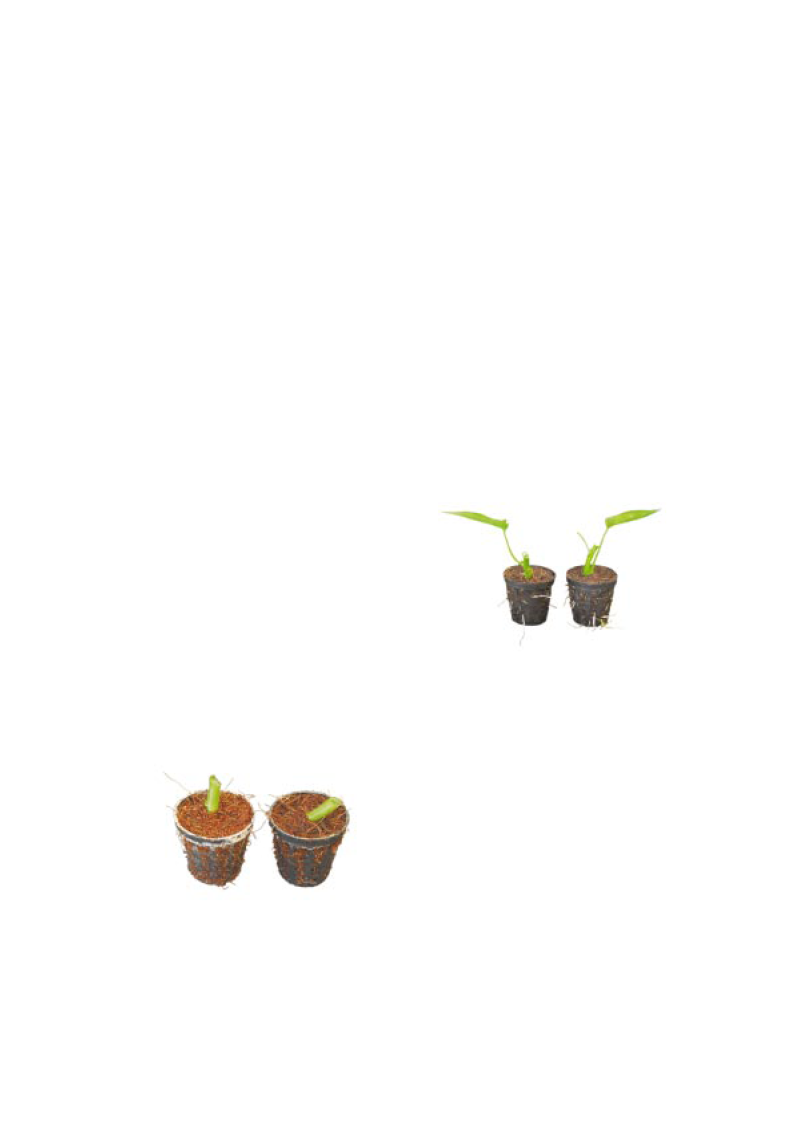
Figure 34: Rooted Kang Kong stem cutting ready
for planting
Nutrient Supply
Nutrient supply is not necessary until the
emergence of first two true leaves. Until such
time apply only clean water. However, when
they unfold, nutrient supply must begin
gradually as the growing medium contains very
little plant nutrients. The fertilizer mixture meant
hydroponics plants could also be used for
nursery plants. Diluted nutrient solution can
be applied every day or nutrient solution
prepared by dissolving 10 g of Albert�s mixture
in 10 litre of water can applied every other day.
20
Seed Germination
Thorough cleaning of the pots followed
by washing with 10% Calcium or Sodium
hypochloride will ensure disease free condition.
Place one seed per block filled with growing
medium at the correct depth in the pots or trays.
Such necessary conditions for seed
germination as moisture, temperature, humidity
must be provided. Germination trays can be
covered with wet papers or cloth to provide
adequate temperature for germination until the
seeds sprout. Remove these papers at the
time of seedling emergence.
Maintain the moisture level of the
medium at correct level for uniform germination
and application of water in the mornings is
preferred.
Planting Material Production
Vegetative parts separated from
mother plants can also be rooted and used as
planting materials. Individual containers or
trays filled with growing medium are used for
rooting these vegetative parts. Select
vegetative parts that are free from pests,
disease causing organisms and nematodes for
propagation. For example, following materials
can be used for propagation.
Figure 33: Selected Kang Kong stem cutting
Once the seedlings or planting
materials reach the correct size for planting,
they can be planted with the medium.
Vegetative parts can sometimes be directly
established in the hydroponics system.
Nursery Period
The nursery period varies with the crops.
Tomato
3 - 4 weeks (2-3 true leaves stage)
Cabbage
4 - 5 weeks (3-4 true leaves stage)
Salad cucumber 3 weeks (3-4 true leaves stage)
Lettuce
2 - 3 weeks
Bell Pepper
4 - 5 weeks
Select vigorous seedlings with the
characteristics for the variety concerned for
establishment in hydroponics. Also tissue-
cultured plants can be established in
hydroponics.
Sponge Nursery Technique
Sponge pieces can be used as nursery
medium instead of the above mentioned media
materials. 2.5 cm cube sponge blocks can be
used for this purpose. Place the seeds at the
centre in a cut made on the topside of the
sponge block.
Sponge nursery is maintained as other
nurseries. Nutrient supply must begin when
the first true leaf begin to unfold. Depending
on the cultivation method, the seedlings can
be planted in hydroponics system with the
sponge block intact. The sponge block may
be removed with minimum damage to roots
when plants begin to grow .
21
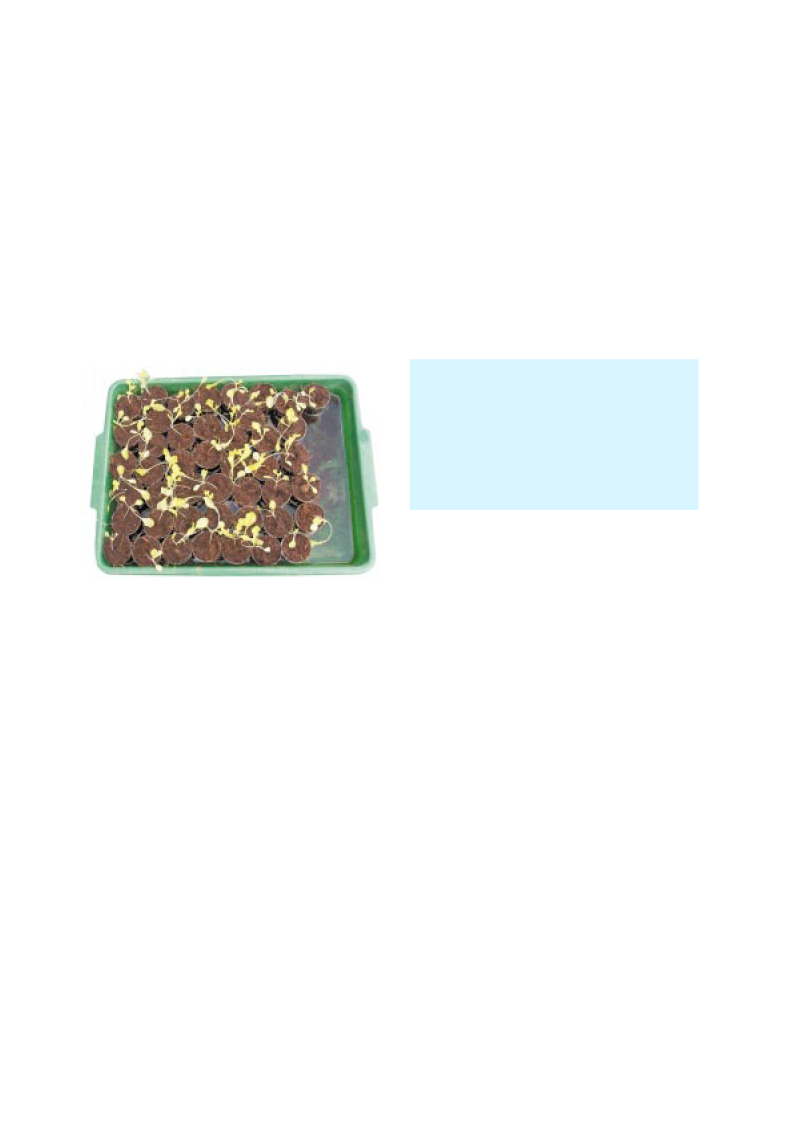
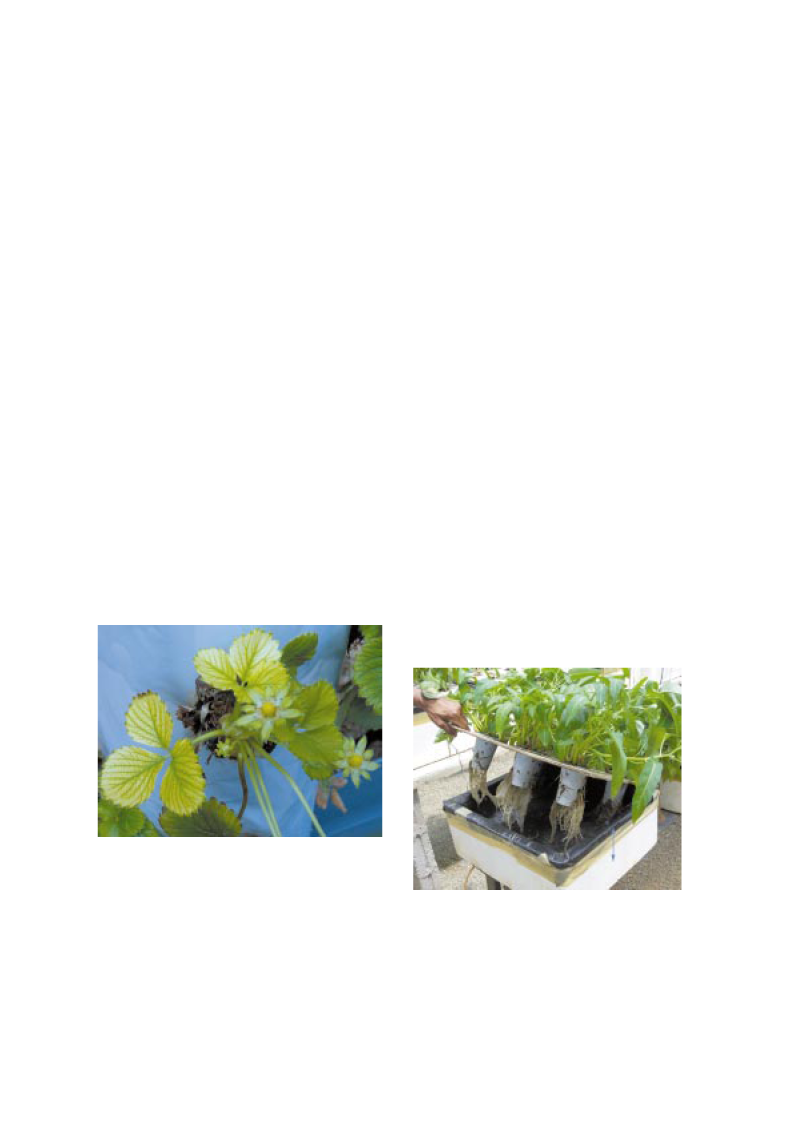
At the early stage, place the trays or pots
in shallow containers that is filled with nutrient
solution in such a way that the tray�s or pots�
lower portion is submerged in the solution. The
nutrient solution will reach the media through
the holes at the bottom of the pots or nursery
trays by capillary action. Vegetative parts for
propagation planted in individual containers or
trays are also placed in shallow nutrient solution
containers as seedling trays.
Figure 35: Nursery pots placed in shallow nutrient
solution containers
The nutrient solution can also be applied
directly to nursery pots after seed germination
or sprouting of planting materials. When
applying nutrient solution directly to nursery
pots,
� place the pots or trays on a flat plane
and pour solution so that it does not come
into direct contact with the small plant;
� at the early stage apply 5-10 ml solution
once a day; and
� when plants grow, 10-25 ml a day once or
twice till establishment.
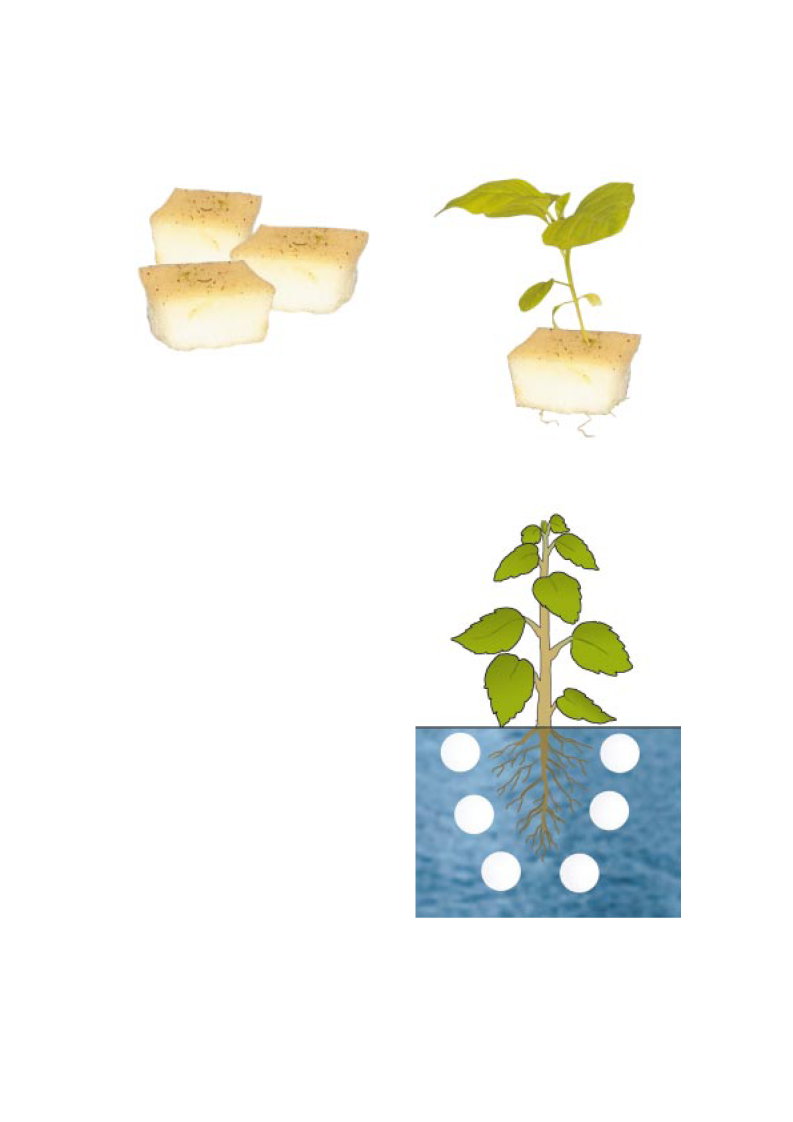
Figure 37: Seedling in a sponge block ready for
transplanting
N
P
K
Fe
S
Mg
Zn
Ni
Mo
Cu
Cl
B
Mn
Figure 36: Sponge block for seed germination
Nutrient Solution for
Hydroponics
Plants require 17 essential elements
for their growth and development. Without
these nutrients plants cannot complete their
life cycles and their roles in plant growth cannot
be replaced by any other elements. These 17
essential elements are divided into macro-
elements (required in relatively large quantities)
and micro or trace elements (required in
considerably small quantities).
The macro elements are carbon (C),
hydrogen (H), Oxygen (O), nitrogen (N),
phosphorous (P), potassium (K), calcium (Ca),
magnesium (Mg) and sulphur (S). The micro
elements are iron (Fe), chlorine (Cl), boron (B),
manganese (Mn), copper (Cu), zinc (Zn),
molybdenum (Mo) and nickel (Ni).
All essential nutrients are supplied to
hydroponics plants in the form of nutrient
solution, which consists of fertilizers salts
dissolved in water. The hydroponic grower must
have a good knowledge of the plant nutrients,
Ca
Figure 38: Plant nutrients in nutrient solution
22
solubility of phosphoric acid, calcium and
manganese drops sharply. The optimum pH
range for hydroponic nutrient solution is
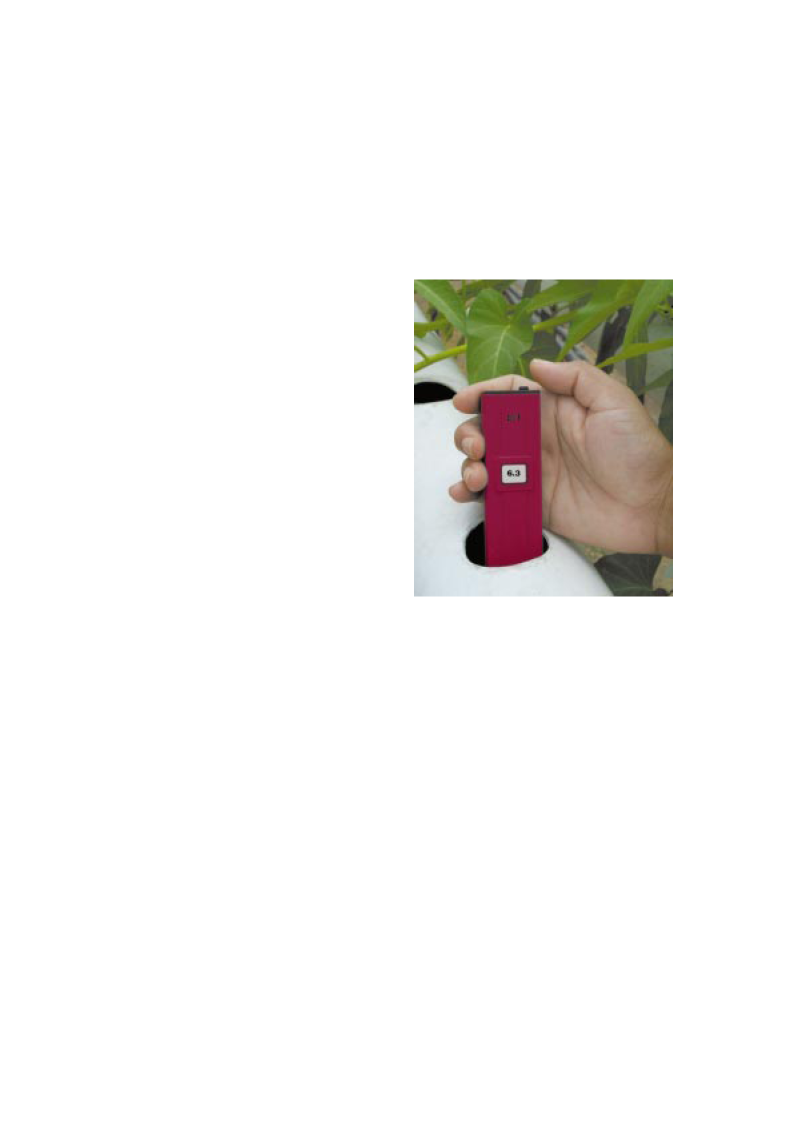
between 5.8 and 6.5.
Figure 39: Measuring nutrient solution pH using a
portable digital pH meter
The further the pH of a nutrient solution
from recommended pH range, the greater the
odds against the success.
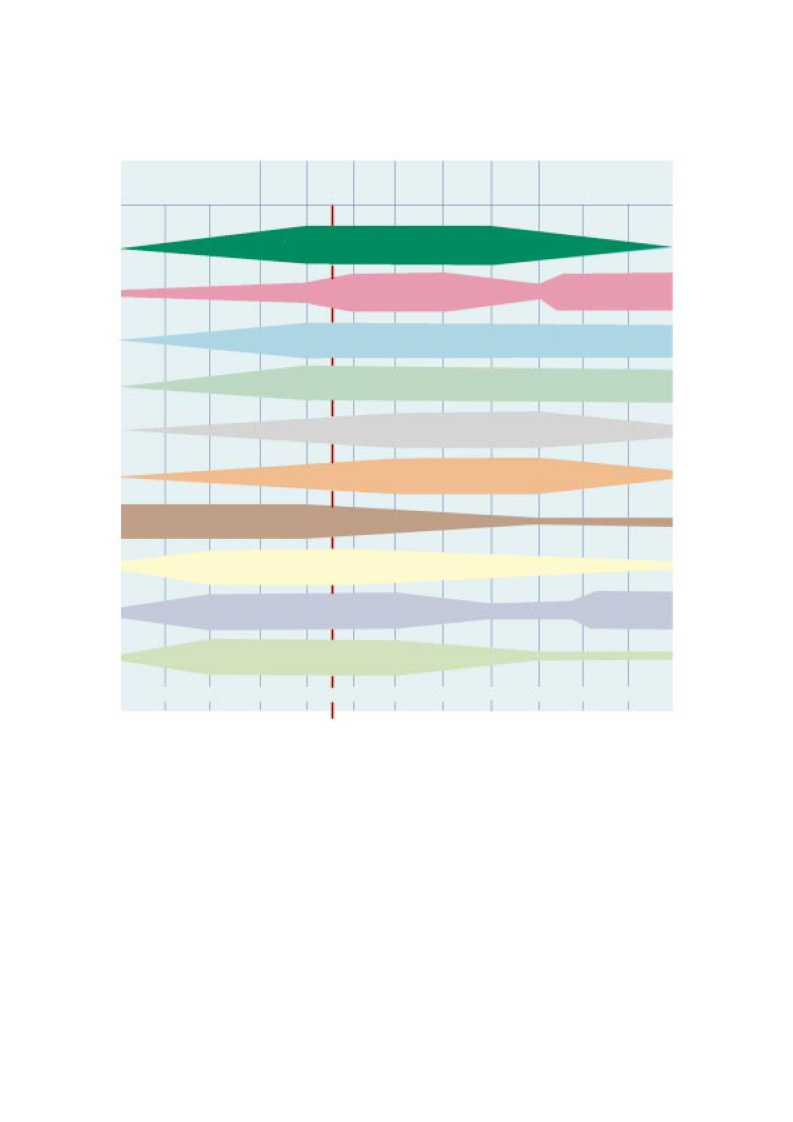
The figure 40 indicates the nutrient
element availability at different pH levels of the
solution. Nutrient deficiencies will become
apparent or toxicity symptoms will develop if
the pH is higher or lower than the
recommended range for individual crops. For
example, if pH is consistently 7.5, one can
expect intra-veinal chlorosis to occur, an
indication of iron deficiency.
23
as management of plant nutrition through
management of nutrient solution is the key to
success in hydroponic gardening.
The hydroponic methods enable
growers to control the availability of essential
elements by adjusting or changing the nutrient
solution to suit the plant growth stage and to
provide them in balanced amounts. As the
nutrients are present in ionic forms in the
nutrient solution and also, not needing to search
or compete for available nutrients as they do
in soil, hydroponic plants reach maturity much
sooner. Optimization of plant nutrition is easily
achieved in hydroponics than in soil.
Nutrient Solution
Management
While optimum nutrition is easy to
achieve in hydroponics, incorrect management
of the nutrient solution can damage the plants
and lead to complete failure. The success or
failure of a hydroponic garden therefore,
depends primarily on the strict nutrient
management programme.
Carefully
manipulating the nutrient solution pH level,
temperature and electrical conductivity and
replacing the solution whenever necessary, will
lead to a successful hydroponic garden.
pH Level
In simple terms, pH is a measure of
acidity or alkalinity on a scale of 1 to 14. In a
nutrient solution, pH determines the availability
of essential plant elements. A solution is
considered to be neutral at pH 7.0, alkaline if
above and acidic if below.
For pH values above 7.5, iron,
manganese, copper, zinc and boron becomes
less available to plants. Should the pH of a
nutrient solution fall below 6.0, then the
strongly alkaline
9.0
9.5
10
strongly acid
4.0
6.0
4.5
5.5
7.5
8.0
5.0
6.5
7.0
6.25
Figure 40: Chart showing the availability of nutrient elements at different pH levels.
The chart shows a pH range of 4.0 to
When plants absorb nutrients and water
10.0. The width of the coloured section for each
from solution, pH of the solution changes.
nutrient represents the availability of that
Therefore, it must be monitored daily, and
nutrient. The widest place denotes the
adjusted to be between the recommended
maximum availability. The narrowest place
ranges. Chemical buffers can adjust the pH of
denotes the least availability. The red line at
a nutrient solution, when it strays outside the
pH 6.25 indicates the maximum number of
ideal. It can be lowered by adding dilute
elements at their highest availability.
concentrations of phosphoric or nitric acids and
24
8.5
very
very
slightly
slightly
acid
acid
alkaline alkaline
Nitrogen
Phosphorus
Potassium
Sulpher
Calcium
Magnesium
Iron
Manganese
Boron
Copper & zinc
slightly slightly
acid alkaline
raised by adding a dilute concentration of
potassium hydroxide. Although it is important
to stay within recommended range, it is far
more important to prevent large fluctuations.
Electrical Conductivity (Ec)
The electrical conductivity indicates the
strength of nutrient solution, as measured by
an Ec meter. The unit for measuring Ec is dS/
m. A limitation of Ec is that it indicates only the
total concentration of the solution and not the
individual nutrient components.
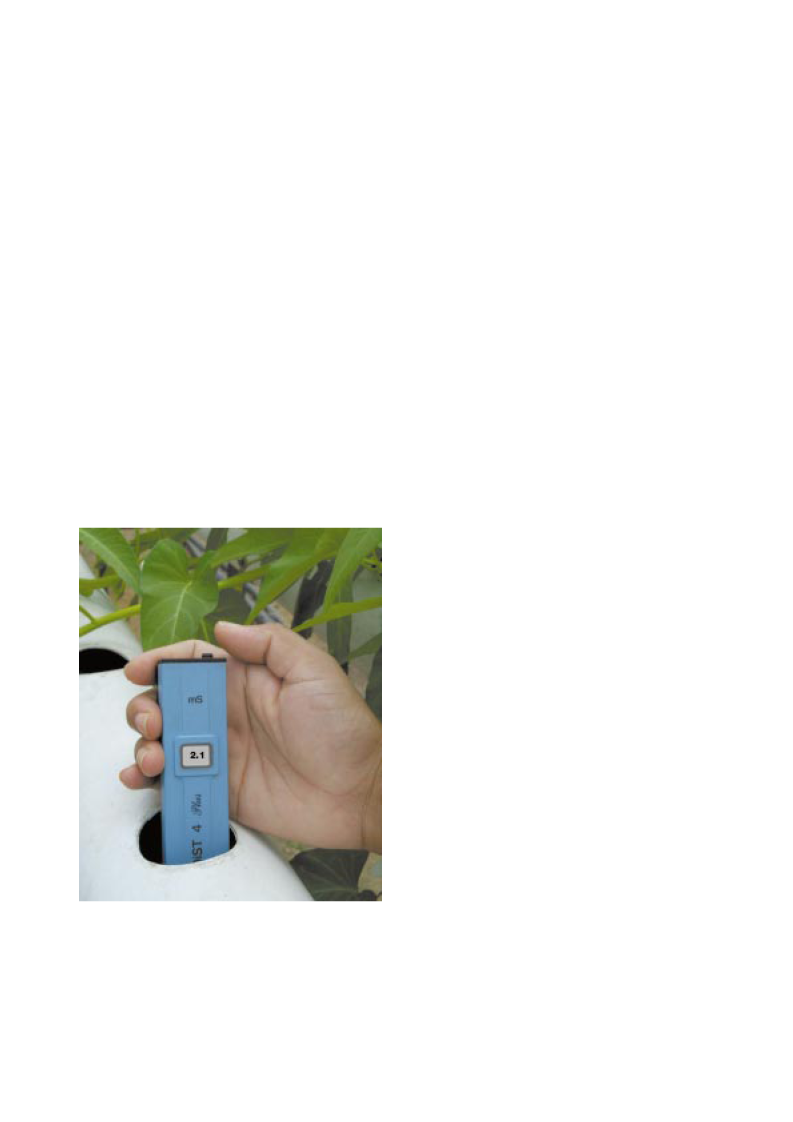
The ideal Ec range for hydroponics
is between 1.5 and 2.5 dS/m. Higher Ec will
prevent nutrient absorption due to osmotic
pressure and lower Ec severely affect plant
health and yield.
Figure 41: Measuring nutrient solution Ec using a
portable digital Ec meter
When plants take up nutrients and water
from the solution, the total salt concentration,
i.e., the Ec of the solution changes. If the Ec
is higher than the recommended range, fresh
water must be added to reduce it. If it is lower,
add nutrients to raise it.
Preparation of Nutrient
Solution
Though hydroponic growers can
formulate their own fertilizer mixtures to prepare
nutrient solutions using completely water-
soluble nutrients salts, a number of
formulations are available in the market to
choose.
It is important to avoid any formulations
that contain impurities like sand, clay or silt.
Such impurities do not supply any nutrients
but they are harmful as they can block the
delivery tubes.
Also avoid any formulation that has
insoluble or less soluble salts. In hydroponics,
the nutrients must be available in solution in
ionic form for plant absorption. If they are found
as salts, plants will suffer from nutrient
deficiency symptoms.
Although urea is completely soluble in
water, it cannot be used in hydroponics, as it
does not break into ionic form in the solution
as it does in soils.
Some fertilizer salts react with each
other to produce insoluble precipitations. For
example, ammonium sulphate and potassium
chloride form less soluble potassium sulphate
in the tank.
Phosphate fertilizers act
problematic in the presence of high calcium
and magnesium concentrations, causing
precipitation of low soluble phosphates.
Therefore, select fertilizers that are compatible
with each other. The table 1 indicates
compatibility of some saltsFertilizer Mixtures
for Hydroponics
25
AN
-
C
C
C
C
C
AS
CAN MAP SOP MOP
C
C
C
C
C
-
L
C
C
C
L
-
X
C
C
C
X
-
C
C
C
L
C
-
C
C
X
C
C
-
Soluble fertilizers
Ammonium nitrare (AN)
Ammonium sulphate (AS)
Calcium nitrate (CAN)
Mono ammonium phosphate (MAP)
Potassium sulphate (SOP)
Potassium chloride (MOP)
Gypsum (G)
Kieserite (KS)
Potassium nitrate (PN)
Table 1: Compatibility chart for some soluble fertilizers
X
X
X
X
C
C
C
C
C
X
C
C
C
L
C
C
-
C
C: compatible, can be mixed in the solution
L: Limited compatibility, mix at the time of use or some precautions must be taken
X: Incompatible, do not mix
Table 2: Chemicals needed to prepare 1000 litres
of nutrient solution proposed by Dr. Alan Cooper.
Fertilizer Mixtures for
Hydroponics
The tables 2 and 3 give nutrient salt
contents of two hydroponics formulations.
These fertilizer mixtures are not suitable
as foliar spray as the EDTA iron (iron chelate)
does not disintegrate easily on plant surface
and therefore, can be harmful to consumers.
Nutrient chemicals
Weight in grams
Potassium dihydrogen phosphate 263.00
Potassium nitrate
583.00
Calcium nitrate
1003.00
Magnesium sulphate
513.00
EDTA iron
79.00
Manganese sulphate
6.10
Boric acid
1.70
Copper sulphate
0.39
Ammonium molybdate
0.37
Zinc sulphate
0.44
26
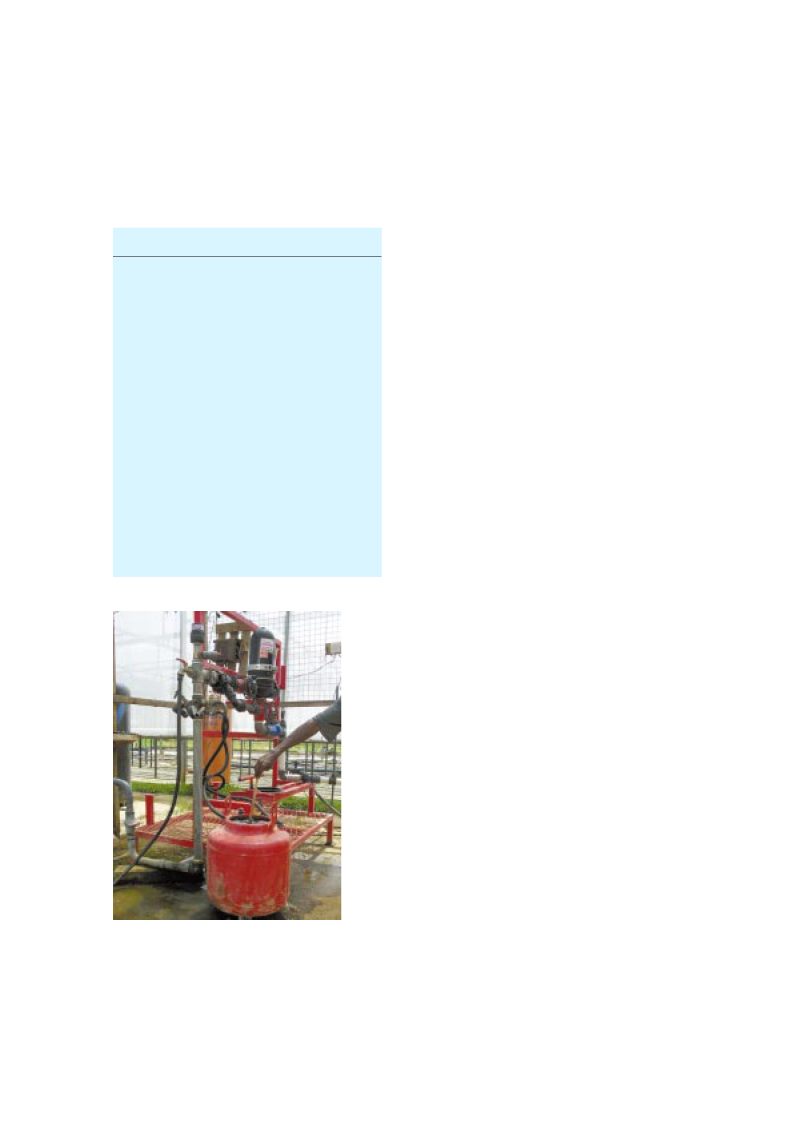
Table 3: Chemicals needed to prepare 1000
litres of nutrient solution (Albert�s mixture,
locally available in the market).
Nutrient chemicals
Weight in grams
Multi-K (Potassium nitrate)
38.00
Refined grade calcium nitrate
952.00
Magnesium sulphate
308.00
EDTA iron
8.00
Zinc sulphate
0.15
Boric acid
0.20
Manganese sulphate
1.15
Copper sulphate
0.10
Mono potassium phosphate
269.00
Potassium sulphate
423.00
Ammonium molybdate
0.03
Figure 42: Fertilizer mixing tank
Fertigation
Fertigation combines the two main
factors of supplying water and plant nutrients
that are essential for plant growth. The right
combination of the two is the key to obtain
high yields and quality produce.
Advantages of Fertigation
� Accurate and uniform application of
fertilizers
� Ability to meet plant nutrient demand under
given climatic conditions and during different
crop growth stages
� Improving fertilizer use efficiency and
reducing leaching below root zone thus
minimizing pollution
� Saving on labour
� Increasing both yield and quality of produce
Factors to be Considered in
Fertigation
1.
Growing media
2.
Fertilizers used
3.
Irrigation water quality
As the first two factors were discussed
earlier, only irrigation water quality is discussed
here.
27

crops, crop growth stage and the hydroponics
technique used. The example below explains
this situation.
However, at all stages of crop growth, the pH
of the nutrient solution must be maintained
between 5.8 - 6.5 and Ec between 1.5 - 2.5
dS/m.
For circulating techniques (DFT and
NFT), supply the nutrient solution for a
predetermined time period.
For aggregate systems (solid media
culture), fertigation can be done manually or
through drip irrigation system. Supply the
fertilizers with irrigation water for a
predetermined time period so that the water
content of the growing media does not increase
beyond field capacity. When fertigation is not
done, the crop must be irrigated with water to
maintain the medium at field capacity.
Quality Factors
pH
Salinity Ecw
Sodium
Chloride
Boron
Bicarbonates
Unit
Water Quality classes
Non-hazardous
Slight to Moderate
Severe
--- Normal Range 6.5 - 8.4 ---
dS/m
me/lit
me/lit
mg/lit
0.00 � 0.8
0.8 � 3.0
3
3
3
-
3
3
-
0.7
0.7-3
3
Irrigation Water Quality
Use good quality water with its pH and
Ec suitable for plant growth. Based on pH, Ec
and soluble salt content, water quality can be
divided into 03 classes (Table 4).
Non-hazardous and medium class water
can be used for fertigation. However, when
latter is used for fertigation, thoroughly leach
the growing medium at least once a year.
Methods of Fertigation
Mix the fertilizers required for a particular
crop with daily water requirement of that crop
and apply manually or through fertigation
system.
The amounts of fertilizers mixed with
irrigation water will vary depending on the
Table 4: Irrigation water quality classes
me/lit
1.5
1.5-8.5
8.5
(Courtesy: Guidelines for interpretation of water quality for irrigation. Western fertilizer handbook.
Page 38).
28
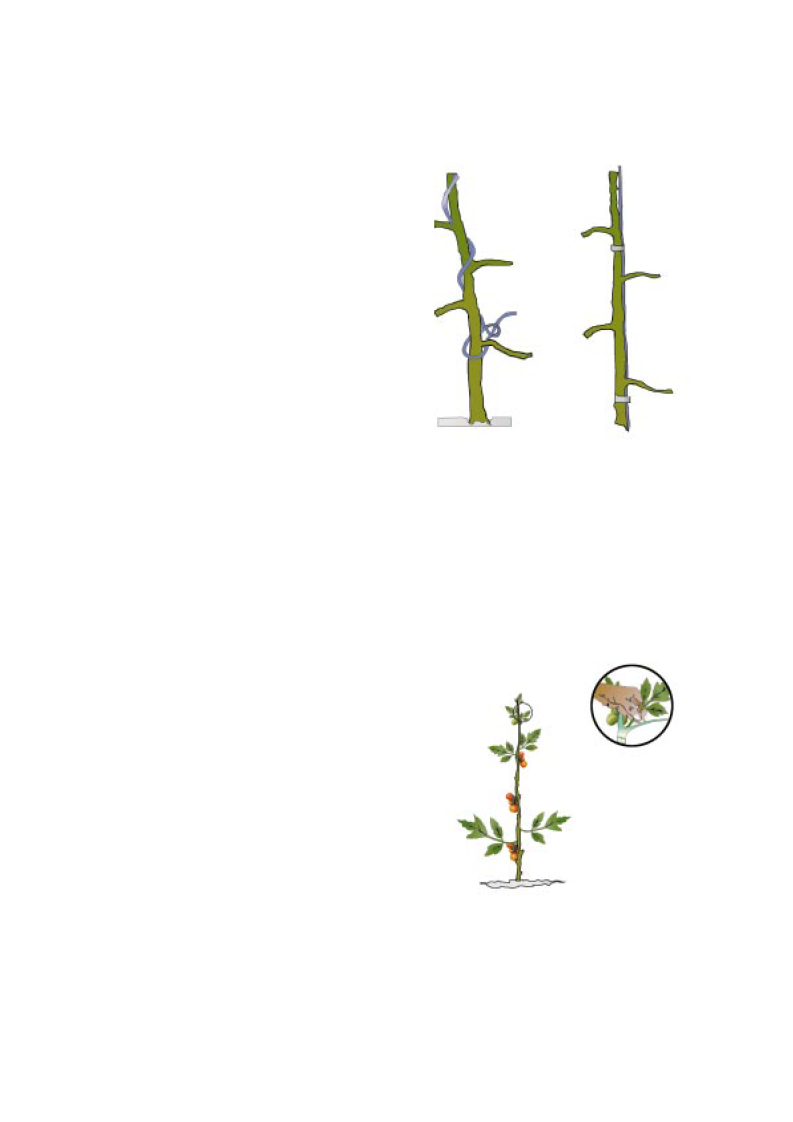
Figure 43: Training plants on vertical support.
the string from the overhead horizontal support
and lower the plants about 60 cm and tie the
string shifting to a side (figure 45). This must
be done every 2 weeks, and the strings must
be long enough to permit lowering during the
entire cropping period.
Figure 44: Removal of side branches in tomato
plants
29
Training and Pruning
In hydroponics, the growing medium
does not provide enough anchorage as soils.
This is more so in liquid cultures as no planting
medium is used. Therefore, growers must
provide artificial supporting structures and train
plants along those structures. Support is
especially important, when tall growing
indeterminate type crop varieties (tomatoes,
cucumber, etc.) or crops bearing relatively
heavy fruits (bell pepper, egg plant, etc.) are
used in hydroponics.
A polythene string can be tied at the
base of each plant using a plastic plant clip or
by a loose non-slip knot as shown in figure 43
and the string is tied vertically to the overhead
horizontal support to hold the plants. When
plants grow, wind the main stems loosely
around the string for support. In the case of
tall growing indeterminate tomato varieties,
placing additional plant clips every 3rd to 4th
nodes will be necessary to prevent the plants
from slipping down.
For salad cucumbers, the vertical
string is attached to each plant with plastic plant
clips or by a loose non-slip knot at the base.
As the plants grow, wind the main stem loosely
around the string for support. Additional plant
clips are attached to prevent plants from
slipping.
Tall growing indeterminate type
tomatoes are trained to a single stem. All lateral
branches are removed when they are about 5
cm long (Figure 44). Prune the lateral branches
every 3 � 4 days, and it is best done early in
the day.
Indeterminate type tomato plants that
produce long term crops are lowered to a
working height as they grow, keeping
production limited to fruit grown on the 2 � 2.5
m of the main stem. When plants grow taller,
remove about 04 leaves at the bottom and untie
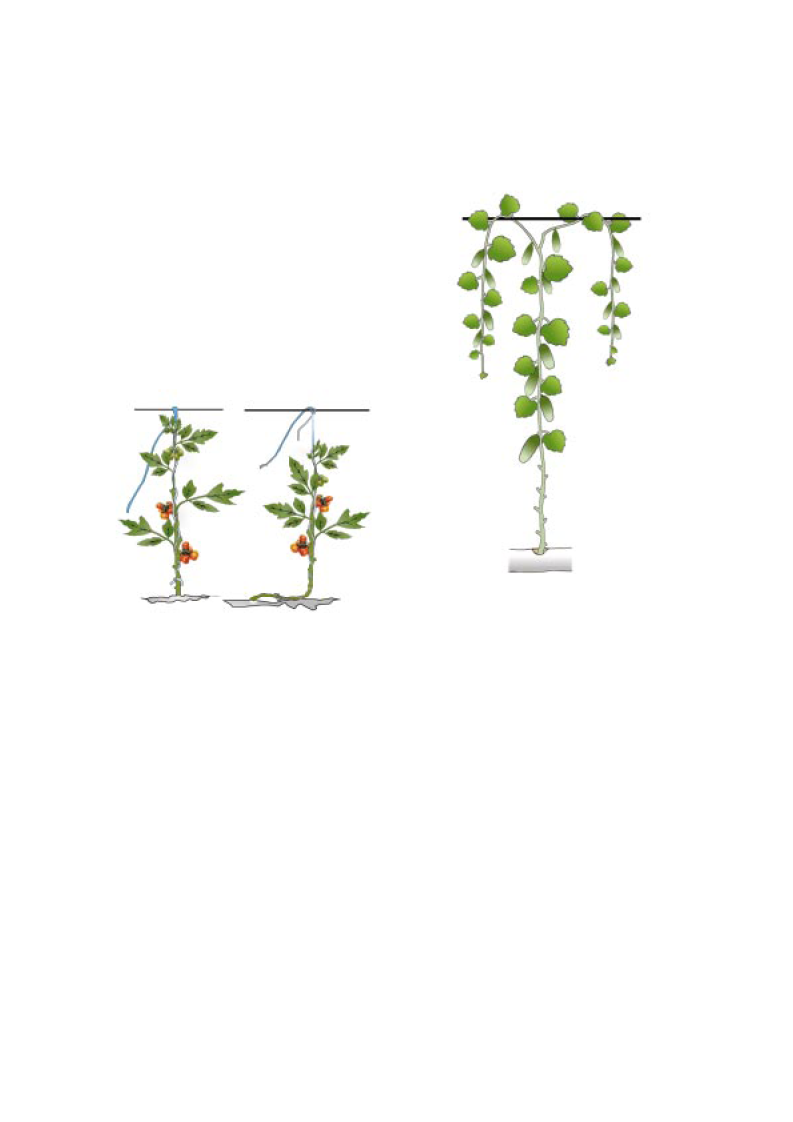
Figure 46: The umbrella training system for
cucumber
Bell pepper plants are trained to two
stems. Vertical strings tied to overhead
horizontal support, support them. Guide these
side stems to the vertical strings. Flowers occur
in axils of each branch. Side shoots arising
from the stems must be pruned after 2 � 3
leaves so that fruiting takes place only on the
two main branches. Periodic fruit thinning may
be required to obtain large, good quality fruits.
30
Tomatoes produce large number of fruits
at each cluster. To get large, quality fruits, fruit
thing will be necessary. Depending on the size
required, 3 to 5 fruits may be left in a cluster.
For salad cucumbers, umbrella system
of pruning can be adopted. It involves pruning
all lateral branches until the plant reaches the
overhead horizontal support (figure 46). There,
the terminal bud is removed and two side
branches are allowed to grow downwards.
Vigorous plants will continue to produce fruits
Figure 45: Tomato plant at left will be lowered the
position at right by retying the support string to the
overhead horizontal support several cm to the
right
on the downward growing lateral branches,
although the rate of fruit production tends to
slow down.
Salad cucumber may produce more than one
fruit per node; these can be thinned out to one
fruit per node or allowed to develop if they are
not curved or otherwise distorted in shape.
Heavy fruiting at lower part of the vine will
reduce production higher up.
� Maintain adequate solution temperature. As
the temperature goes up, plant respiration
increases causing a higher demand for
oxygen. At the same time, the solubility of
oxygen decreases. This requirement is
more critical in green houses and net
houses where the temperature is bound to
increase during mid afternoons. Steps must
be taken to counter such increase.
� Always ensure that there is plenty of
dissolved oxygen in the nutrient solution as
the plant roots absorb oxygen. Lack of
oxygen will reduces up take of nutrients and
thereby the yield and also causes root rot.
In closed systems, if the recollected solution
is allowed to fall into the solution tank from
a height, natural aeration will take place.
� In root dipping techniques, maintain
adequate air space above the nutrient
solution in the container as success
depends on the rapid growth and quantity
of roots that are exposed to the air. These
roots absorb oxygen for the plants. Ideally,
top two thirds of the young root system must
be in the air and the rest must be floating
in the nutrient solution.
Figure 48: Luxuriant growth of water and air
absorbing roots takes place when there is
adequate air space above solution
31
Management
Requirements of
Hydroponics/
Soil-less Culture
Meet the following requirements to
develop and maintain a successful
hydroponics/soil-less cultivation of crops. If
any of these conditions are not fulfilled, one
cannot obtain economical yields.
� Maintain the nutrient solution pH in the
range of 5.8 to 6.5, and electrical
conductivity (Ec) in the range of 1.5 to 2.5
dS/m, as these ranges are suitable for plant
growth. Any pH or Ec outside these ranges
will reduce availability and uptake of
nutrients and will also damage plant roots.
Plants are the best indicators of the nutrient
availability. Look for nutritional disorder
symptoms in plants and adjust nutrient
solution accordingly (Figure 47).
Figure 47: Iron deficiency symptom in strawberry
� Avoid any sudden changes in nutrient
solution concentration as it can result in
unsuitable pH and Ec.
� In root dipping techniques, during crop
growth, when the solution level in the
container goes down, the ion concentration
may increase. Such increase is detrimental
to plant growth. If this condition is observed,
siphon out the remaining solution and refill
with fresh solution.
� Ensure adequate light for the hydroponics/
soil-less culture plants. Light and all other
requirements are the same as though grown
in open fields.
� Always use pest and disease free seedlings
and planting materials for establishment of
hydroponics crops. Remove and destroy
any infected plants as soon as they are
found.
� If nematode problem is observed in solid
media culture, discard the plants and
sterilize the growing medium. If in doubt,
discard and replace the medium. Also
ensure that he water supply is also free
from nematodes.
� Algae can build up in the system and block
the small tubes used for the delivery of
nutrient solution. Use black colour tubes to
avoid such problems. Between crops,
thoroughly clean the system using a mild
solution of chlorine. After cleaning,
thoroughly flush the system with fresh water
before replanting.
� Adequate spacing is necessary for plant
growth and when vine crops are grown,
supports must be provided.
� In open aggregate techniques, there is a
possibility for nutrients to leach when water
is applied. Therefore nutrient solution may
be applied continuously instead of water to
supply both water and nutrients.
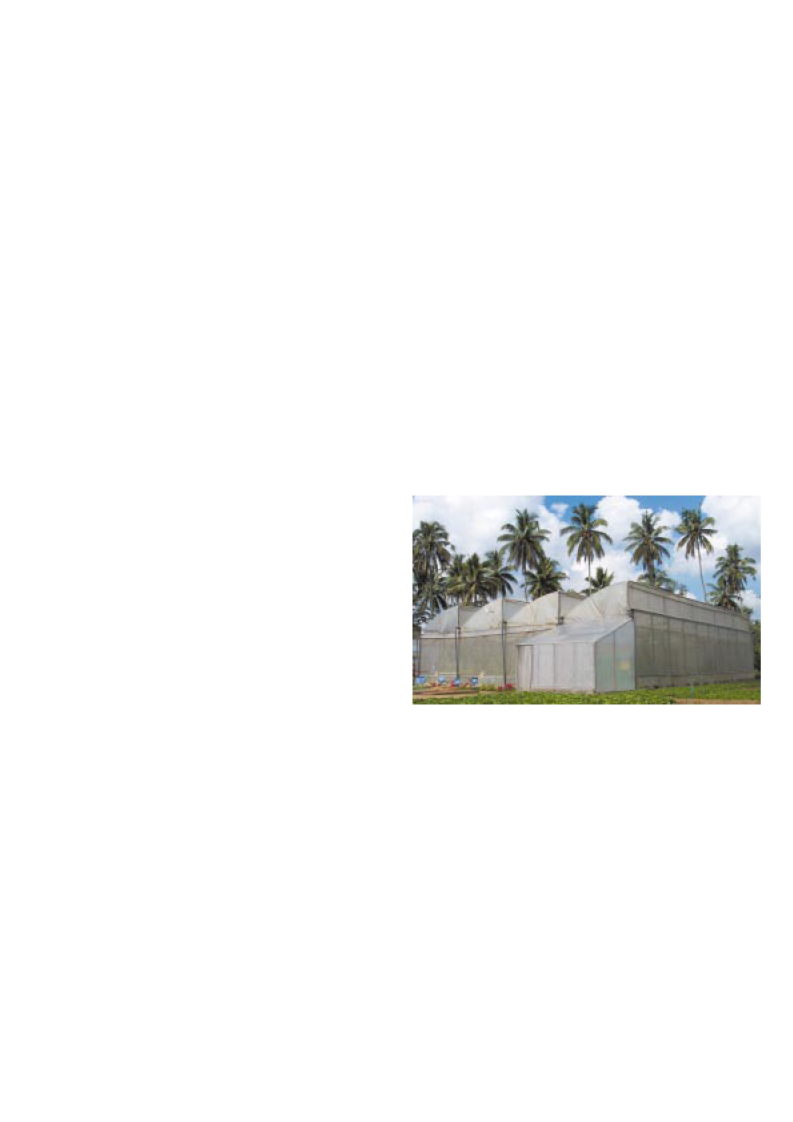
Soil-less Culture and
Controlled Environment
Agriculture
Hydroponics culture is probably the
most intensive method of crop production in
today�s agricultural industry. In combination with
green houses and protective covers (controlled
environment agriculture), it is high technology
and capital intensive. With the possibility of
adjusting air and root temperature, light, water,
plant nutrition, and adverse climate, this
combination can be made highly productive,
conservative of water and land and protective
of the environment.
Figure 49: Protected structure
Advantages
High-density maximum crop yield, crop
production where no suitable land exists, crop
cultivation regardless of seasonality, more
efficient use of water and fertilizers and minimal
use of land area are the principal advantages
of soil-less culture in combination with
controlled environment agriculture. Another
32
by the use of mechanical vibrators. Blowers
can be used to improve the airflow inside the
structures.
Hormones may also be used to
increase the chances of pollination inside
protected structures. For example, 0.15% 4-
CPA (Para chlorophenoxy acetic acid - a kind
of auxin) is widely used to induce fruiting of
tomato in Japan. Hormone application is
effective for tomato 3 days before and 3 days
after blooming. Application more than once,
higher concentration or too early application
can result in malformed fruits.
Some Problems and
Solutions in
Hydroponics
As experienced in normal crop
husbandry, pests diseases and too affect
hydroponics plants and they also show
physiological as well as nutritional disorders
under unfavourable conditions.
Physiological Disorders
Sudden changes in environmental
factors, incorrect nutrition supply or irrigation
can bring about physiological disorder
symptoms in plants. Some crop varieties are
more prone to these conditions than others.
Blossom end rot of tomato
At the bottom end of tomato fruits, brown,
sunken leathery spots appear (Figure 50).
Calcium deficiency, dry growing medium and
sudden supply of water, salt accumulation in
root zone are some causal factors. Avoiding
these conditions will prevent blossom end rot.
33
major benefit is the possibility of obtaining
pesticide free products, which fetch higher
prices at the increasingly ready markets, at
present.
Precautions
High temperature
One serious concern in Sri Lanka and
other tropical countries is the rise of solution
temperature during mid afternoons in green/
net houses and under protective covers.
Adoption of closed system of hydroponics
where the solution is recycled helps reduce
such rise in temperature to some extend.
Further, misting of water to crops when
temperature rises, use of exhaust fans, use of
white colour containers to hold solutions,
painting gullies/pipes with white colour, etc. will
help reduce the build up of heat from sunlight.
Sunlight
In protected structures, it was
observed that growth and yield of plants of
inner rows of hanging bag and grow bag
techniques were poor due to low sunlight
availability. Therefore, ensure that enough
sunlight reaches the inner rows of these
techniques.
Pollination
As protected structures effectively
prevent insects reaching crops, pollination by
insects does not take place in the protected
structures. Also lack of natural airflow also
reduces the chances of natural pollination.
High temperatures normally experienced inside
protected structures also interfere with
pollination as it reduces pollen viability.
Therefore, artificial pollination must be done
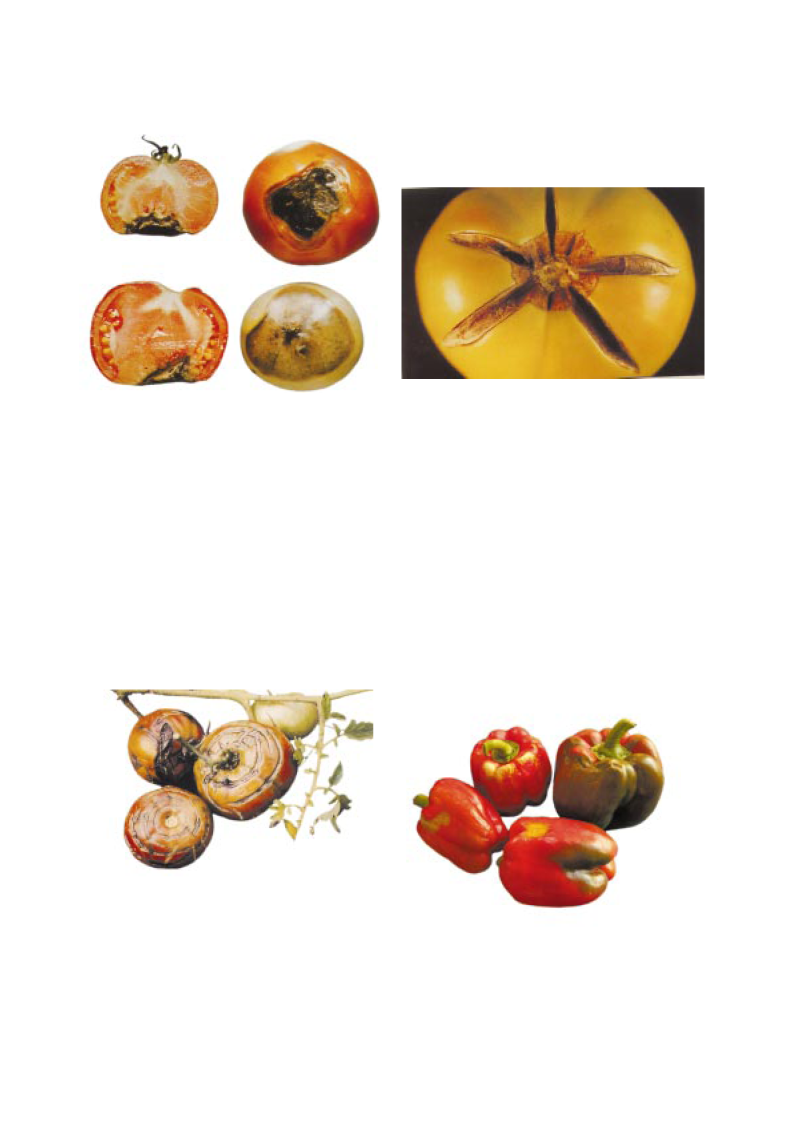
Figure 50: Blossom end rot of tomato
Concentric fruit cracking of tomato
Concentric cracks appear around the
fruit stalk (Figure 51) or cracks extending from
fruit stalk (Figure 52) appear. High day
temperatures, large differences between day
and night temperature and sudden change in
growing media moisture content are the causes
of this condition.
Figure 51: Concentric fruit cracking of tomato
Figure 52: Cracks extending from stalk
Shrink cracks of bell pepper
Shrink cracks appear commonly around
the fruit shoulders. Rapid evaporation of
condensed moisture on fruit surface causes
shrink cracks. Gradual change from day to
night temperatures and night ventilation can
prevent this condition.
Figure 53: Shrink cracks of bell pepper
34
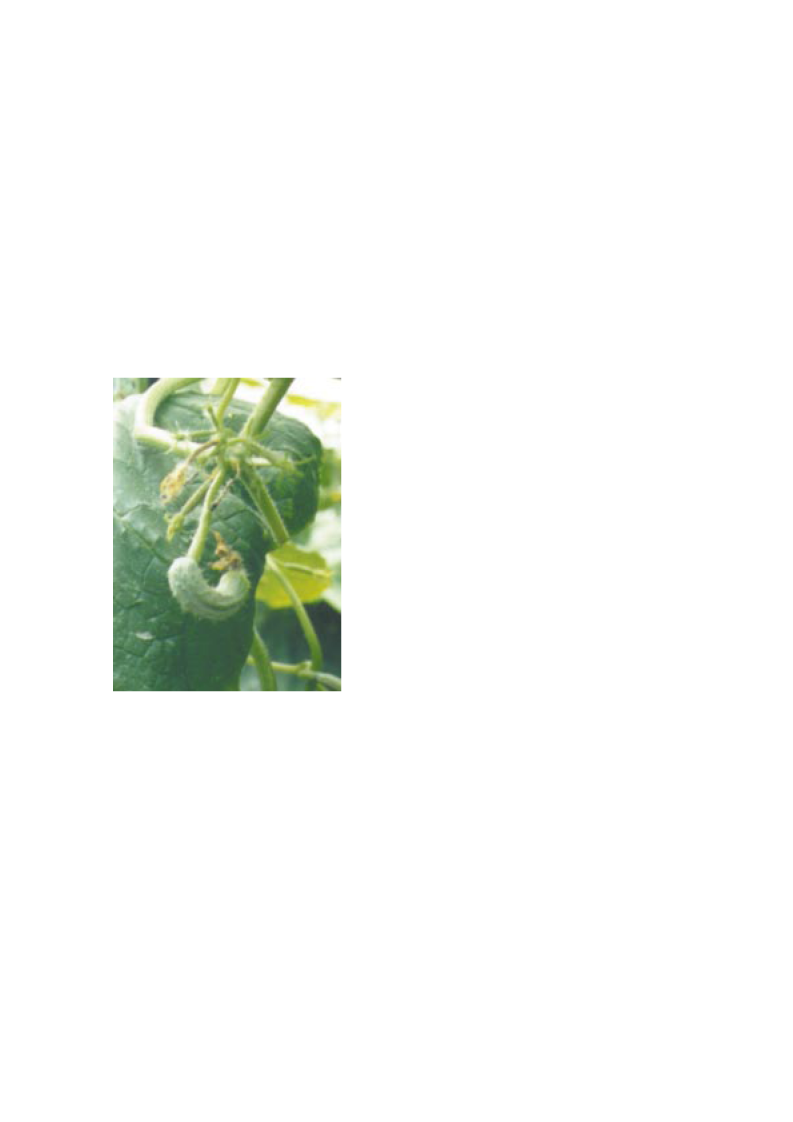
Fruit crooking of cucumber
Fruit crooking is a serious physiological
disorder in cucumber (Figure 54). The
curvature of known as fruit crooking begins at
early stages of fruit development and may be
caused by adverse temperature, excessive
moisture in growing medium, poor nutrition,
excessive fruit load or insect damage. Affected
fruits must be removed as soon as noticed.
Figure 54: Fruit crooking of cucumber
Insect Pest and
Disease Damage in
Hydroponics
In hydroponics, soil borne diseases are
virtually eliminated. Certain common pests and
diseases however, can affect these plants.
Vigilance and early identification are important
in controlling such problems. Keep the
environment of the hydroponics plants clean
and adopt correct cultural practices such as
supply of well-balanced nutrients to maintain
the plants healthy. Pests and diseases less
affect healthy plants. Always start the
cultivation with healthy seedlings/planting
materials.
Adopt Integrated Pest Management
(IPM) strategies recommended for vegetables.
If necessary apply recommended chemicals
to control insect pests or diseases and always
strictly adhere to recommended pre-harvest
intervals.
Nutritional Disorders
In hydroponics all the essential
nutrients are supplied through the nutrient
solution. If the solution is deficient or excess
(toxic) in any of these nutrients or the pH or
the Ec of the solution is beyond the suitable
range, the plants will show nutritional disorder
symptoms.
These symptoms include changes in
growth rate, size of plants, leaf shape and
colour, leaf thickness, stem colour, inter node
distance, nature of root system, etc. In addition,
fruiting characteristics may change. Although
these external symptoms vary according to
crops and varieties, some common symptoms
are described in table 5 and figures 55 to 62.
35

Nutrient Element
Excessive/Toxicity symptoms
Nitrogen
Phosphorus
Pottassium
Sulfur
Magnesium
Calcium
Deficiency Symptom
Growth is restricted and plants are generally Plants usually dark green in
yellow (chlorotic) from lack of chlorophyll, colour abundant foliage but
especially older leaves. Younger leaves remain usually with a restricted root
green longer. Stems, petioles and lower leaf system.Flowering and seed
surfaces of tomato can turn purple.
production can be retarded.
Table 5: Some common nutritional disorder visual symptoms exhibited by plants
No primary symptems yet
noted. Sometimes copper and
Zinc dificiency occurs in the
presence of excess
Phosphorus.
Usually not exesively absorbed
by plants. Exess potassium
may lead to magnesium
dificiency and possible
manganese, zinc or iron
dificiency.
Reduction in growth and leaf
size. Leaf symptoms often
absent or poorly defineed.
Sometimes intervienal yellowing
or leaf burning.
Very little information available on
visual symptoms.
No consistent visible
symptoms.Usually associated
with excess carbonate.
36
Plants are stunted and often a dark green
colour. Anthocyanin pigments may acumulate.
Dificiency sympems occur first in mature
leaves. Plant maturit is often delayed.
Symptoms first visible on orlder leaves. In
dicots, these leaves are initially chlorotic
but soon scattered dark necrotic lesions
(dead areas) develop. In many monocots,
the tips and margins of the leaves die first.
It not often encountered. Generally yellowing
of leaves, usually first visible in younger leaves.
Intervienal chlorosis which first develops on
the older leaves. The chlorosis may start at
leaf margins or tip and progress inward
intervienally.
Bud development is inhibited and root tips often
die.Young leaves are affected before old leaves
and become distorted and small with irregular
margins and spotted or necrotic areas.

Deficiency Symptom
Excessive/Toxicity symptoms
not often evident in natural
conditions. Has been observed
after the application of sprys
where it appears as necrotic spots.
Burning or firing of leaf tip or
margins. Bronzing, yellowing and
leaf abscission and sometimes
chlorosis. Reduced leaf size and
lower growth rate.
Some times chlorosis, uneven
chlorophyll distribution. Reduction
in growth.
Yellowing of leaf tip followed by
progressive necrosis of the leaf
beginning at tip or margins and
proceeding toward midrib.
Exess zinc commonly produces iron
chlorosis in plants.
Reduced growth followed by
symptoms of iron chlorosis,
stunting, reduced branching,
thickening and abnormal darkening
of rootlets.
Rarely observed. Tomato leaves turn
golden yellow.
37
Nutrient Element
Iron
Chlorine
Manganese
Boron
Zinc
Copper
Molybdenum
Pronounce intervienal chlorosis
similar to that caused by
magnesium deficiency but on the
younger leaves.
Wilted leaves which then become
chlorotic and necrotic,eventually
attaining a bronze colour. Roots
become stunted and thikened near
tips.
Initial symptoms are often intervienal
chlorosis on younger or older leaves
depending on species. Necrotic
lesions and leaf sheding can develop
later.
Symptoms vary with species. Stem and
root apical meristems often die. Root
tips often become swollen and
discoloured. Internal tisues sometimes
disintegrate (or discolour) (e.g.�heart
rot� of beets). leaves show various
symptoms including thikening,
brittleness,curling, wilting, and chlorotic
spotting.
Reduction in internode length and leaf
size. Leaf margins are often distorted
or puckered. Sometimes intervienal
chlorosis.
Natural deficiency is rare. Young leaves
often become dark green and twisted
or misshapen, often with necrotic spots.
Often intervienal chlorosis developing
first on older or midstem leaves, then
progressing to the youngest (similar to
nitrogen deficiency). sometimes
marginal scoching or cupping of leaves.
Table 5: Continued

Figure 57: Manganese deficiency in tomato
Figure 61: Magnesium deficiency in tomato
Figure 58: Iron defRiciency in tomato
Figure 62: Sulphur deficiency in strowberry
Pictures curtsey: Compendium of strawberry diseases and compendium of tomato diseases
by American Pathological Society.
38
Figure 59: Nitrogen deficiency in tomato
Figure 60: Zinc deficiency in strowberry
Figure 55: Calcium deficiency in strowberry
Figure 56: Iron deficiency in strowberry
Limitations of
Hydroponics/
Soil-less Culture
� Higher initial capital expenditure. This will
be further high if the soil-less culture is
combined with controlled environment
agriculture.
� High degree of management skills is
necessary for solution preparation,
maintenance of pH and Ec, nutrient
deficiency judgment and correction,
ensuring aeration, maintenance of
favourable condition inside protected
structures, etc.
� Considering the significantly high cost, the
soil-less culture is limited to high value crops
of the area of cultivation.
� A large-scale cultivator may have to
purchase instruments to measure pH and
Ec of the nutrient solution.
� Energy inputs are necessary to run the
system.
� Yields were found to decrease when
temperature of the solution rises during
warm periods.
39
Advantages of
Hydroponics/
Soil-less Culture
� Land is not necessary. It can be practiced
even in upstairs, open spaces and in
protected structures.
� Clean working environment. The grower will
not have any direct contact with soil.
� Low drudgery. No need of making beds,
weeding, watering, etc.
� Continuous cultivation is possible.
� No soil borne diseases or nematode
damage.
� Off-season production is possible.
� Vegetable cultivation can be done with
leisure sense.
� Many plants were found to give yield early
in hydroponics system.
� Higher yields possible with correct
management practices.
� Easy to hire labour as hydroponics system
is more attractive and easier than cultivation
in soil.
� No need of electricity, pumps, etc. for the
non-circulating systems of solution culture.
� Possibility of growing a wide variety of
vegetable and flower crops including
Anthurium, marigolds, etc.
� Water wastage is reduced to minimum.
� Possible to grow plants and rooted cuttings
free from soil particles for export.
Fodder crops -
Sorghum, Alphalfa, Barley,
Bermuda grass, Carpet
grass
Cereals -
Rice, Maize
Condiments -
Parsley, Mint, Oregano,
Sweet basil
Fruit crops -
Strawberry,
Flower/ornamental crops - Anthurium,
Merrygold, Coleus, roses,
carnations, orchids,
chrysanthemums,
Medicinal crops - Alovera
Harvesting, Grading,
Storage and Marketing
Harvesting
Harvesting at correct maturity will reduce
post harvest loses. One must know the age of
the fruits or plants to correctly identify maturity.
Reports on crops may be maintained for this
purpose. Harvest fruits by cutting with a sharp
knife with minimum damage to fruits and plant
stem.
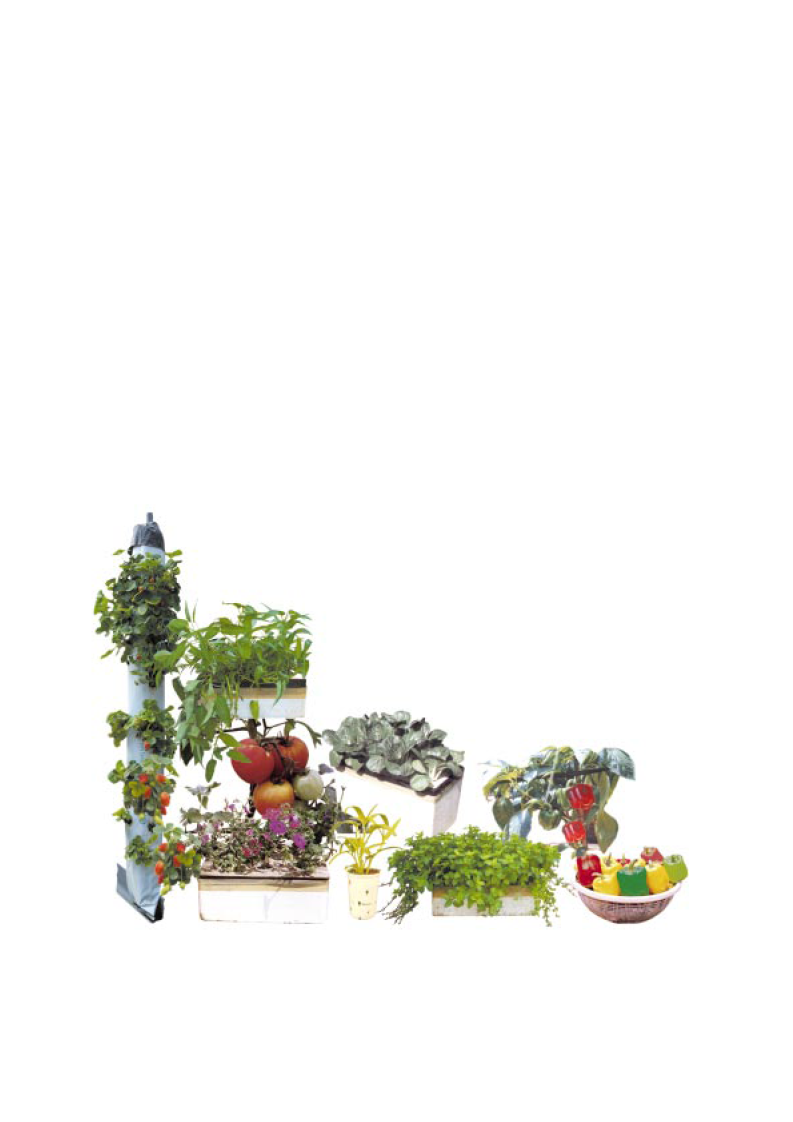
Crops to Grow with
Hydroponics/
Soil-less Culture
A variety of crops can be grown using
hydroponics/soil-less culture. However, priority
must be given to high-value crops depending
on the market situation.
Leafy vegetables - Lettuce, Head lettuce,
Kang kong, Gotukola
Vegetables -
Tomato, Egg Plant, Green
bean,Beet, Winged bean,
Capsicum,Bell pepper,
Cabbage,Cauliflower,
cucumbers, melons,
raddish
Figure 63: Some crops that can be hydroponically grown
40
Harvest bell pepper after they develop
their standard colour. For salads, harvests
before the fruits reach full red ripen stage; when
they are at yellow-red stage. It is better to
wear a pair of gloves while harvesting and use
disinfected knife or scissors.
At least some colour should be
showing in tomato fruit before harvest. If the
stems are attached care should be taken during
handling to avoid any cuts or bruises.
Cucumbers must be harvested with no
attached stem when they reach a uniform
diameter throughout the fruit length, but before
any yellowing appears at the blossom end.
Harvest strawberry fruits when they begin to
turn red.
Leafy vegetables must be harvested
before they reach their full maturity. Select the
correct stage of maturity for ornamental plants
and fruits depending on the market
requirements.
Grading
When the harvest is in fruit form,
discard odd shaped, damaged, or spotted fruits
and grade according to their sizes into large,
medium and small size groups. It may be
suitably labelled to indicate its quality (for
example, free of pesticides).
Storage
After grading, most vegetables must
be stored in cool dry place. Storing in large
plastic containers with large holes for aeration
is advisable.
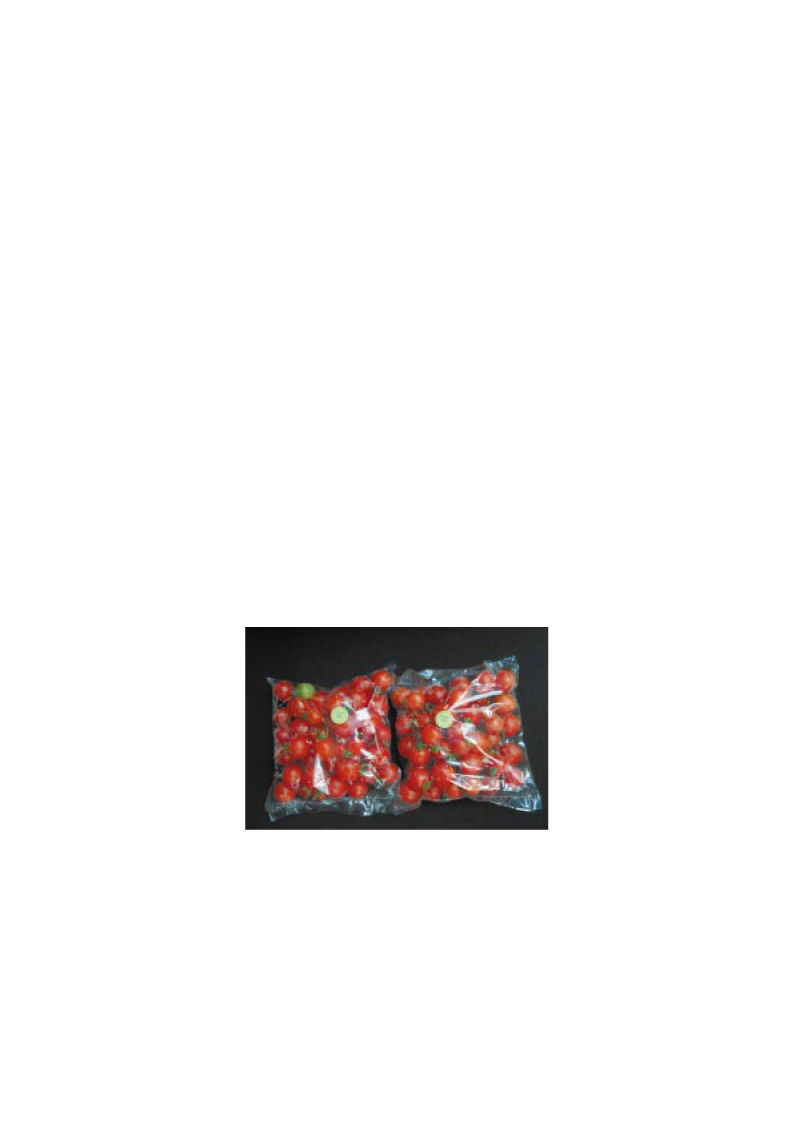
Marketing
Depending on the market requirement,
produce can be sold in small packing. They
can be suitably labelled. The packing must
have aeration holes.
Figure 64: Packing of tomato for marketing
41
Equipment for
Hydroponics
Submersible or ordinary water pumps,
Ec meter, pH meter are the essential equipment
necessary to operate a circulating hydroponics.
PVC pipes can be used as channels in these
systems.
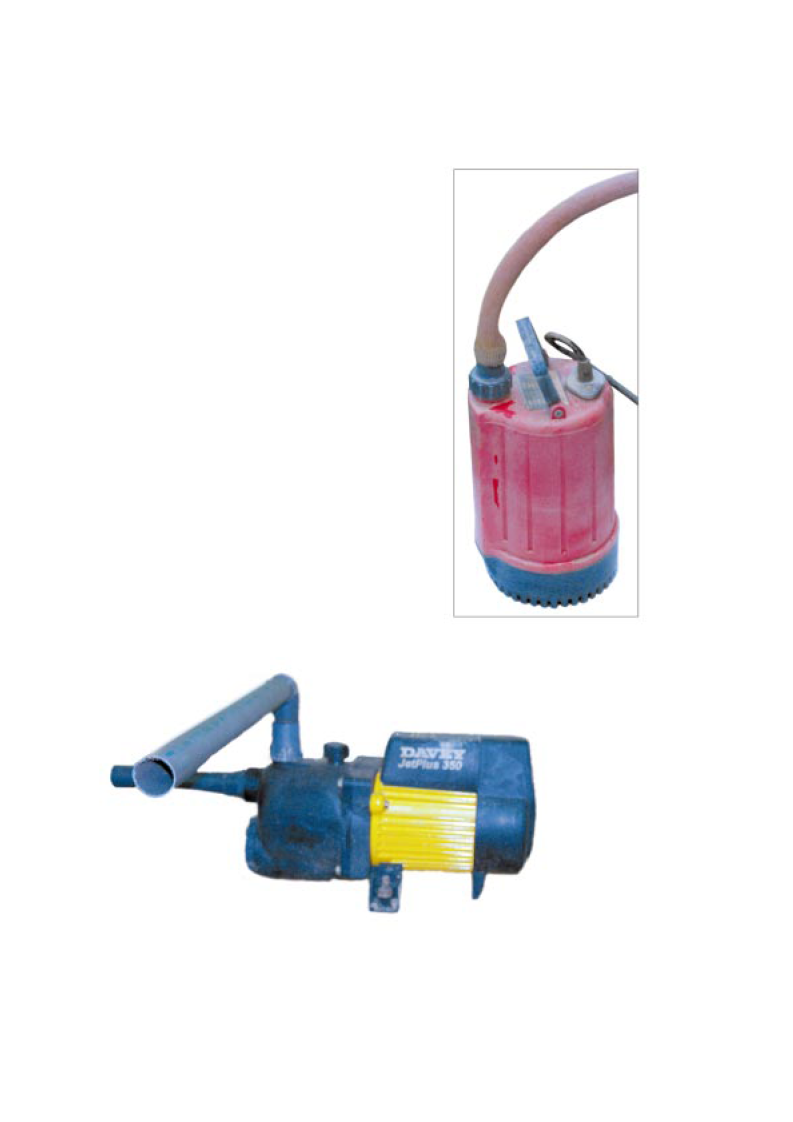
Water Pumps
The water pump must be made up of
materials that are non-reactive with nutrient
salt solution.
Stainless steel shaft,
polycarbonate or stainless steel impeller, pump-
house and water seal must be there in the
pump to be used in hydroponics.
One does not require a pump with very
high head for circulating the nutrient solution
in hydroponics systems. Therefore, a domestic
water pump with 0.5 HP will suffice. A safety
device is a must with the water pump as the
nutrient solution more effectively conducts
electricity compared to water. Therefore, a very
sensitive trip switch must be used to disconnect
electricity supply whenever the need arises.
Figure 65: A domestic water pump
Figure 66: A submersible water pump
42
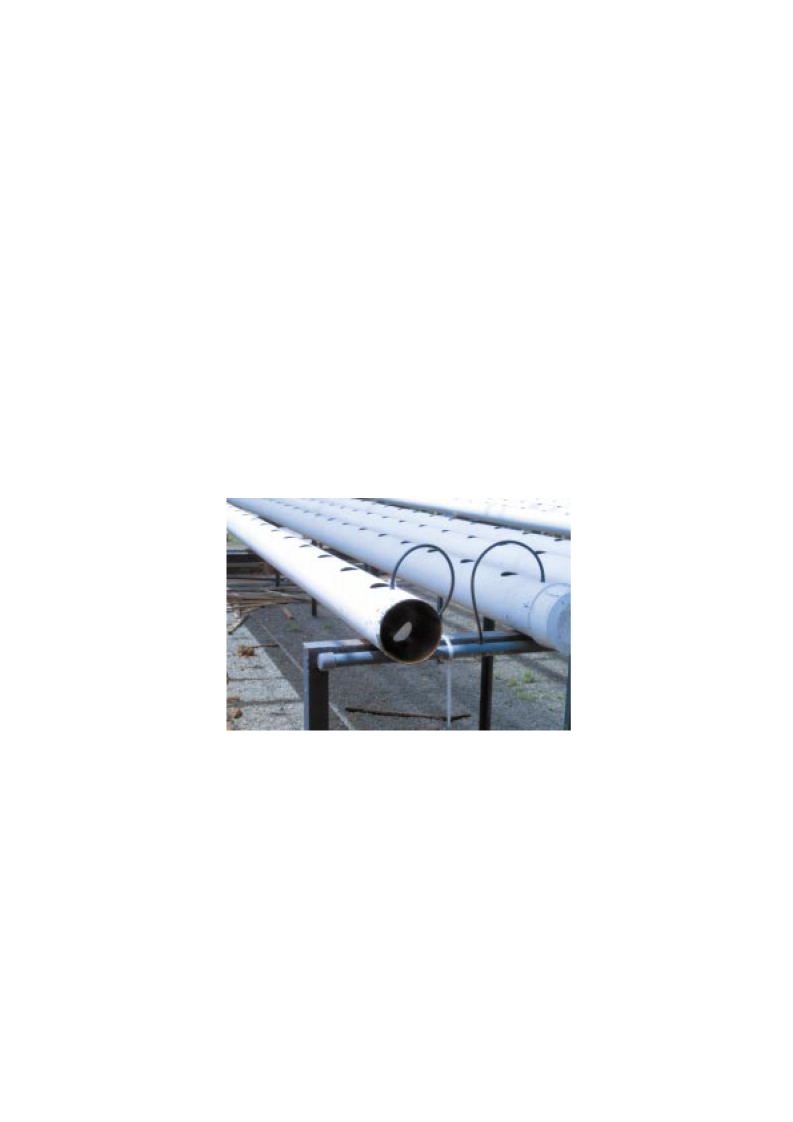
Figure 67: PVC pipe system for hydroponics
43
PVC Pipes
Type 400 or class 4 100 mm PVC pipes
have to be used in circulating hydroponics as
the channels. PVC pipes with thinner walls
will sag and thereby reduce the flow rate of
nutrient solution. The result will be lack of
oxygen supply for the plant roots. UV resistant
pipelines are preferable. Painting these pipes
white will prevent the increase of nutrient
solution temperature. The flow rate required
in hydroponics is very small ranging from 1 to
3 litres per minute. Therefore, an over-flow
pipe will have to be fitted to adjust the flow
rate.
Timer and Oxygen
Detection Sensor
When the plants are small, their
oxygen requirement is low. Therefore, the
nutrient solution circulating time period can be
limited. Limiting the circulating time periods
can also reduce the electricity consumption.
For this purpose a timer may be used to set
the circulating time manually or an oxygen
concentration detection sensor may be
included in the system, so the sensor can
activate the pump whenever the oxygen
concentration of the nutrient solution level goes
down.
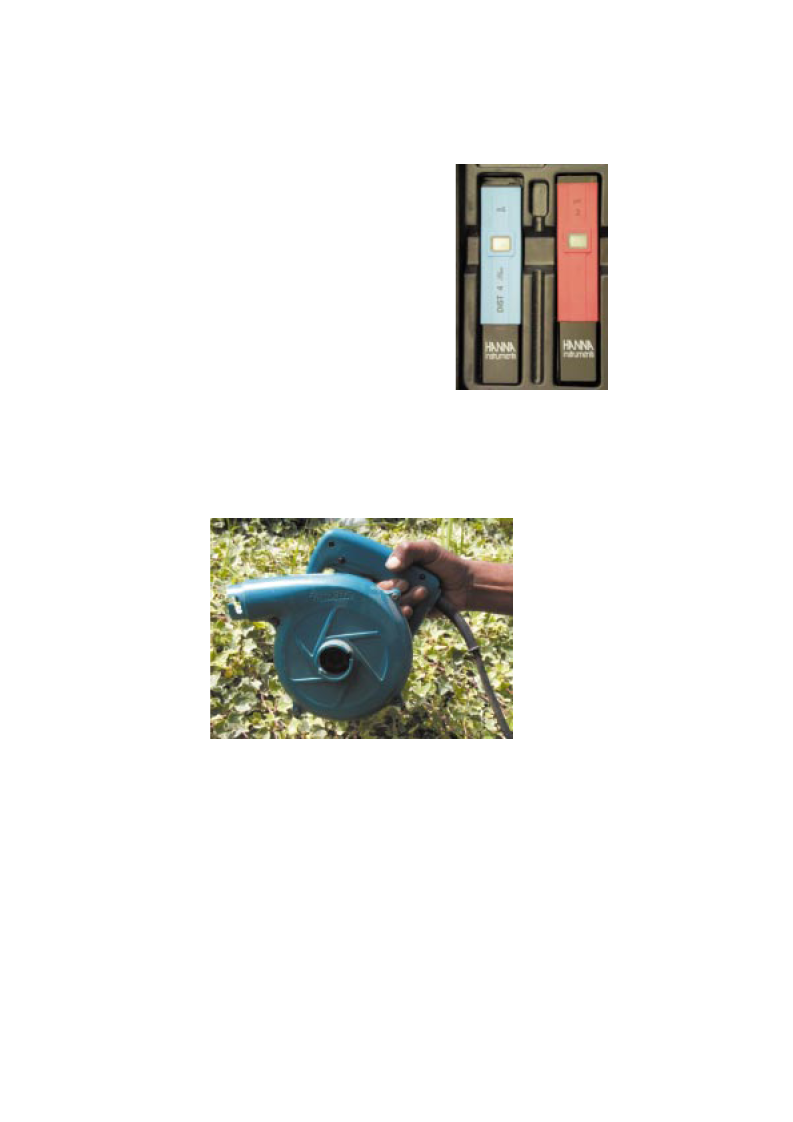
pH and Ec Meters
Simple and portable Ec and pH meters
must be used to monitor and maintain the Ec
and pH at correct levels.
Blowers
These devices help send airflow
through the plants so that plants shake and
pollens are distributed to facilitate pollination
inside protected structures.
Figure 68: Simple digital pH and Ec meters
Figure 69: A simple blower
44
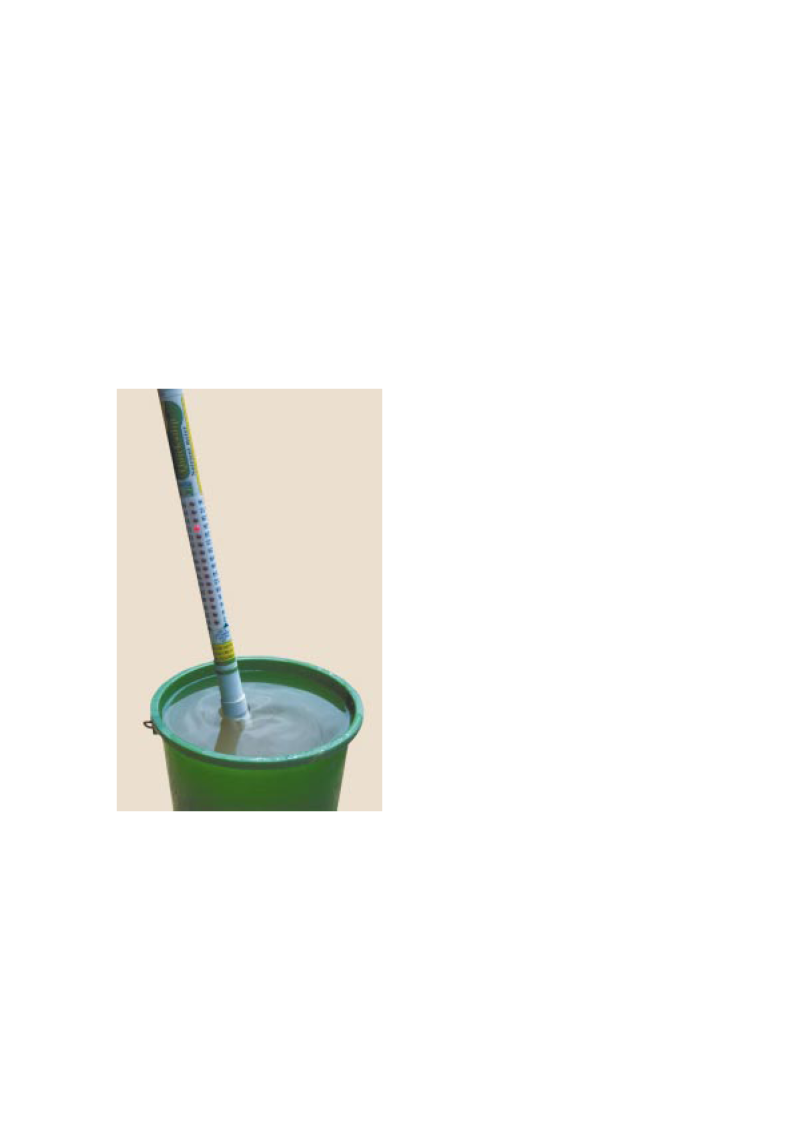
Pollinators
These simple electrical device vibrate
the individual plants when touch them so that
pollination is facilitated inside the protected
structures.
Nurtimeter
In addition to the Ec, this meter helps
measure the nutrient contents of the solution.
Figure 70: A nutri-meter
45